Animation fundamentals
Inbetweening
Head turns
Walks
- The Passing position, Inbetween drawings
- Walk cycles
- Background pans
- Front-on walks
- Adding the Arms
- Personality
Run
Realistic touches
Animating animals
<a href="#history">History</a><br>
<li id="animation">Animation<br>
- Inbetweening

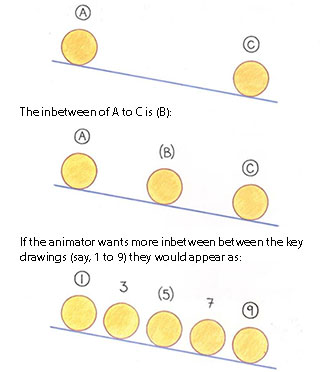
- An inbetween is а drawing that is usually exactly between two extremes, ог key drawings.
- Consider for example, a ball rolling from A to C.
- Consider for example, a ball rolling from A to C.
- Iп а studio, inbetweening is done bу the assistant. It is essential that the assistant accurately carry out what the animator has indicated.
- Bad inbetweening can turn a potentially excellent piece of smooth animation into a staccato movement, irritating to the eye. Sloppy inbetweening has to be redone, costing the studio money. Obviously, the fundamental requirement of inbetweening is accuracy.
* - In animation and filmmaking, "shooting on twos" refers to the practice of showing each unique drawing or image for two consecutive frames. In a standard 24-frame-per-second (fps) production, shooting on twos means you only create 12 unique images for every one second of film.
- An inbetween is а drawing that is usually exactly between two extremes, ог key drawings.
- Head turns
- Producing realistic head turns requires careful inbetweening.
- The natural path:
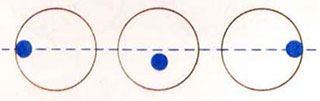
- Remember that everything that moves in life, moves in arcs.
- А straight inbetween will cause the features of the face to slide across the head and make the action look mechanical.
- To avoid this and make the action appear more realistic, the breakdown must be placed on an arc. A more natural breakdown thus appears as:

- If the pupil is moving from one side of the eye to the other, it is also essential that the action move on an arc—otherwise, a sliding effect will occur. The movement of the pupil should be:
- Remember that everything that moves in life, moves in arcs.
- Producing realistic head turns requires careful inbetweening.
- Walks
- The Passing position, Inbetween drawings
- Since the main movements of walking originate from the legs and lower body, focus on this area first. One step consists of the following:
- Since the main movements of walking originate from the legs and lower body, focus on this area first. One step consists of the following:
- The Passing position, Inbetween drawings
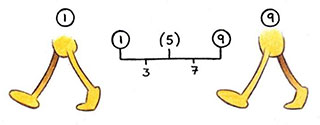
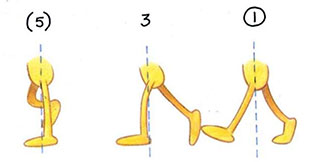
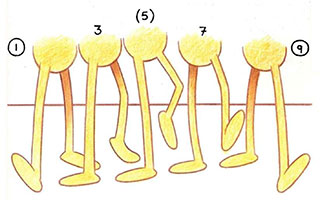
- To make the right foot move forward from drawing 1 to drawing 9 (which is one step), we will use three inbetweens.
- The midway position (5) between any two keys is normally known as the breakdown position, but with walks, it is called the "passing position". The passing position between the two step keys (1 and 9) basically looks like this:
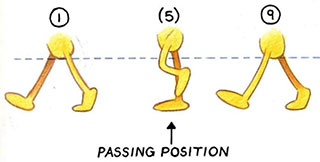
- Note that the body is raised higher in the passing position than in the key extremes. This is because, in the passing position, the leg is straight beneath the body, and, since the leg does not shrink, it naturally forces the body upward.
- Now that the passing position is complete, the inbetween must be put in.
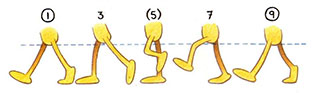
- Note that the height of the two inbetween body positions falls naturally between the extremes and the passing position.
- In drawing 3, the toe is still in contact with the ground; otherwise, the body weight would not be in balance with the legs and the figure would seem to fall backward.
In Figure 7, the heel is also touching the ground to help maintain balance.
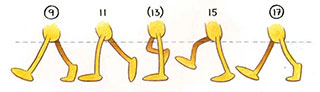
- To complete the movement, the next step must be animated—from drawing 9 to drawing 17. This time the other foot is the one being lifted up, brought through, and put down ahead of the body.
- Walks
- Walk cycles
- In animation, a walk cycle is a series of frames drawn in a loop to create the illusion of a character walking.
- The classic walk cycle is absolutely still relevant and fundamental in animation, serving as a core skill for animators. It isn't just an old technique; it's a timeless skill that remains central to creating convincing and expressive characters in any animation style. But its application has evolved with digital tools, now used in both traditional (hand-drawn) and CG (computer-generated) animation.
- With a walk cycle, the character's walk is repeated on-the-spot, while the background pans through the scene. A walk cycle is slightly more demanding technically, but it saves a lot of time and money.
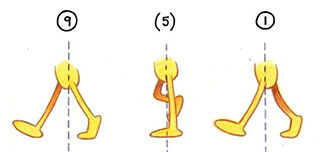
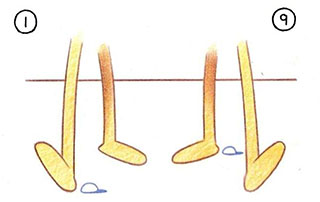
- In a walk cycle, the two extreme positions are basically tracebacks of each other. There is, however, a slight difference: although they are in identical positions in relation to their screen location, in drawing 1 the right foot is trailing, and in drawing 9 it is forward.
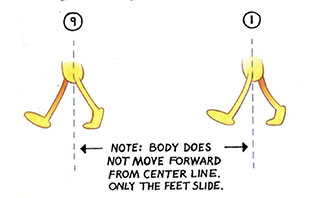
- For the passing position, the body is merely raised vertically, while the foot is slid back along the ground to the midway position. The free leg (swing leg) is positioned as in a normal passing position.
- Remember that the body is merely moving vertically up and down (not forward), while the contact foot is slid back midway.
- In animation, a walk cycle is a series of frames drawn in a loop to create the illusion of a character walking.
- Walk cycles
- Now the inbetween positions are put іп, based on the same principles. The body of drawing 3 is midway between 1 and (5), while the foot slides back to midway between the two.
- Remember, however, that the toe of the free leg is still in contact with the ground, so it, too, must slide back the same distance that the contact foot is moved.
- Similarly, drawing 7 is placed between (5) and 9. This time, however, the heel of the free leg must contact the ground ahead of the heel in extreme 9 (the same amount as the slide-back distance on the contact foot).
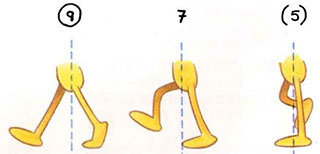
- The cycle is completed by inbetweening 9 back to 1. All positions аге identical to those of 3, (5), and 7, but this time the left foot is the free-leg foot.
- Walks
- Background pans
- То complete the illusion of movement, the background has to be panned through the scene at identical distances to the slide distances of the contact foot, which should be equal in each drawing.
- The background pan has to move in the reverse direction from that in which the character is walking. If the character appears to walk from right to left, then the background must be panned from left to right.
- Obviously, the background has to be specially lengthened to facilitate the panning. The number of frames in the scene and the distance moved in each frame will determine the exact length that it must be.
- То complete the illusion of movement, the background has to be panned through the scene at identical distances to the slide distances of the contact foot, which should be equal in each drawing.
- Walks
- Front-on walks
- Frequently, a walk cycle has to be animated front on, rather than in profile. Sometimes it even has to be animated back on. With a front-on walk cycle, you use the same principles as with a profile walk, but you must think a little more when applying them.
- For a start, always keep the "principles of perspective" in mind when attempting a front-on walk cycle. If, for example, the character's step moves from 1 to 9, the keys appear as:
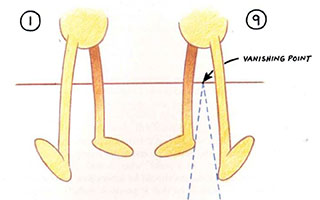
- Notice how a point оп the heel of each foot follows а line of perspective, which converges on the vanishing point on the horizon. If the walk is to be effective, any slip of the contact leg between the two key positions must follow this line of perspective. With this in mind, apply the same principles as you would for the profile walk to get the passing position:

- The inbetweens are added.
- For these walks the background cannot be panned. Instead, the background must be animated, shrinking in perspective as it moves into the distance. This requires much more work, but if it’s well done it is very effective.
- The basic rule is the same—however far the contact foot slides on the cycle, the background objects must travel the same distance when they move in the background animation. If there is a stone on the ground next to the contact foot on the first key, it must remain on all the inbetween drawings, right through to the next key, and beyond.
- This rule applies (о everything іп the background, not just to objects that are close to the contact foot. Obviously, animating the entire background can be both time-consuming and expensive.
- Front-on walks
- Walks
- Adding the Arms
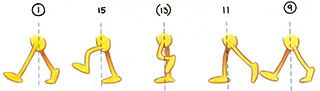
- The most important thing to remember in all standard walks is that if the left leg is forward, the right arm is forward to counterbalance it (see drawing 1). Similarly, if the right leg is forward, the left arm is forward (see drawing 9).
- From the passing position, the inbetweens 3 and 7 can be produced, completing one step.
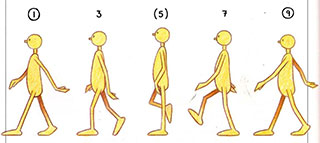
- Repeat the whole procedure—using the opposite arm and leg positions—to obtain the other step.
- The most important thing to remember in all standard walks is that if the left leg is forward, the right arm is forward to counterbalance it (see drawing 1). Similarly, if the right leg is forward, the left arm is forward (see drawing 9).
- Adding the Arms
- Walks
- Personality
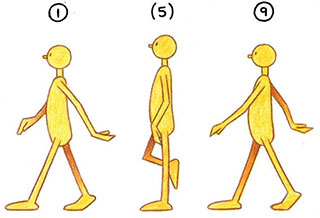
- Although you can now draw the basic standard walk, it is still rigid and mechanical, without personality. To make it more human, you must look more closely at the walk in action.
- You may see a young girl taking short, sharp, perky strides, while an elderly, arthritic woman limps slowly, with her weight principally to one side. Or a young boy may swing his arms vigorously as he almost marches beside his mother, who is loaded with shopping bags and hardly moves her arms at all. Compare the clipped walk of a businessman with the uncoordinated meandering of a drunk.
- The more you look, the more you will realize that although everyone follows a basic pattern of movement, no two people have the same walk. Their size, weight, personality, speed, and psychological and physical well-being all contribute to making their walking movements unique.
- Experiment with this and then explore some variations. In addition to varying body movements, you сап add different head, leg, and arm positions. The variations can be stunning. And the more you try, the more you will learn.
- Although you can now draw the basic standard walk, it is still rigid and mechanical, without personality. To make it more human, you must look more closely at the walk in action.
- Personality
- Run
- Comparing Runs and Walks
- Run is a faster and more dynamic version of a walk.
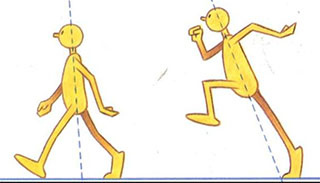
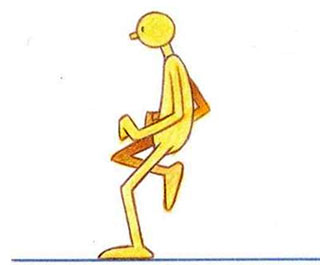
- Everything that applies to а walk, applies to а run—only more so. The upand-down movement of the walk is exaggerated in the run to give it more snap. This is because in a run the body is not so much lifted by the straight leg of the passing position (as it is in a walk), but is more driven upward by the push-off of the key contact foot.
- In а run the arms move more vigorously than in a walk, because they are responsible for driving the legs into action. Olympic sprinters, for example, are not so much trained to move their legs faster as to punch their arms faster—which, in turn, prompt the legs to move quickly. Also, in a sprint, the arms punch hard in a bent position, for added speed. This is because a bent arm is a shorter lever to move, and—as scientists and engineers know—the shorter the lever, the faster it can be moved.
- Also, because you are trying to obtain more forward momentum in a run than a walk, the body lean is much more pronounced.
- One final pointer for а run is that, in contrast to a walk, the stride covers а lot of ground—more than the legs can reach in a natural stride position with both feet on the ground. Obviously, drawing a run demands more thought than drawing a walk, but fewer drawings! The track-and-field definition of a walk is that one foot must be in contact with the ground at any one moment. In a run, however, both feet lose contact with the ground for most of the stride. A run can be drawn in as few as three drawings. This is crude, however, and too fast—and it is rarely convincing unless the scene requires a kind of furious, scrabbling run.
- Like walks, runs have their own personalities, depending on the requirements of the scene, the psychological state of the character, and even on the texture of the surface on which the character is running. Consider, for instance, the difference in running styles for a sprint and a marathon. The sprinter uses short, sharp, explosive movements—caring little for preserving stamina. The marathon runner, however, sacrifices speed for economy and runs in a far more relaxed, economic, upright style.
- Where the figure is running is another consideration. If the figure is running downhill, he will lean back slightly and open his arms more, to help brake his speed. If he is running uphill, however, he will lean forward and drive his arms harder, to give him the added impetus to get up the hill.
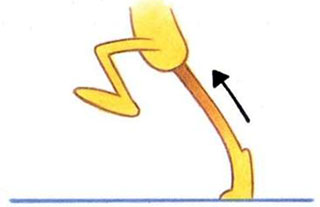
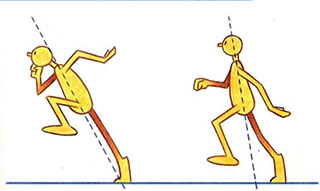
- It all depends on what the running figure has to contend with. With any run, however, the contact foot drives the character up and forward far more than is necessary on any walk. Therefore, the key position has to be dynamic. In other words, the driving-off position must have thrust and direction. Consider these two drawings as an example of a sprinter's action.
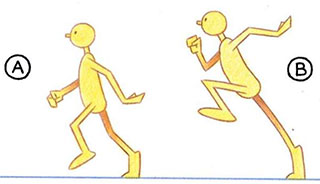
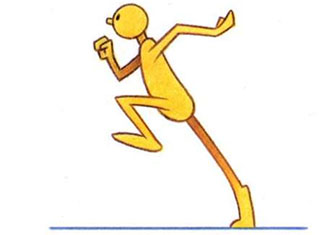
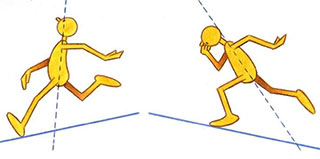
- Obviously drawing В is more dynamic. It is stronger, has direction, апа shows that the character really knows where he is going. The first is weak and uncoordinated; it looks more like a stumbling, exhausted marathon runner at the end of a race than a purposeful, explosive sprinter. The way the key positions in a run are drawn says everything about the type of run. Look at drawing B again. It’s worth noting that in a run—unlike a walk—the body weight is way ahead, out of balance with the contact foot. This communicates that the character either has to get the other foot beneath him fast or he will fall flat on his face. Here, then, is another secret of a good run—constantly avoiding a fall by rushing the feet through beneath the body weight. Generally, the faster the run, the greater the lean. The next key position in the run is the equivalent of the stride position in the walk. In a run, however, this is the point where there is no contact with the ground. The drive from the contact foot causes the body to rise, while the free leg is moving through quickly to contact the ground. The stride position in a run may therefore appear like this:
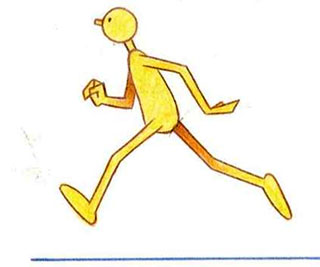
- The third key position is the contact position. The contact leg is now bent to cushion the weight of the body coming down again, and therefore there is a slight sinking of the whole body. The far arm is already driving through, anticipating the left leg swinging through for the next step.
- Run is a faster and more dynamic version of a walk.
- Comparing Runs and Walks
- Anticipation
- When animating any major action in a scene, it is always necessary to anticipate the action before initiating it.
- If a character is going to run off-screen-left from a standing start, it is first necessary to give him a short movement to screen-right to anticipate it.
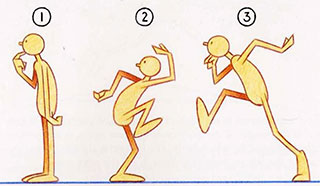
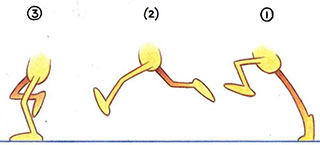
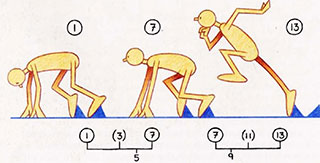
- This is often seen in Disney or Warner Brothers cartoons, where the main character sees another character and speeds off after him. You always see a static pose (1), followed by a wind-up anticipation (2), and then a fast scurry, or run (3), out of shot. Actually, if the anticipation is convincing enough, you can dispense with the run stage altogether and just pop the character off the picture. This effect can be further enhanced if objects in the background are sucked out of shot in the wake of the off-screen character. But remember that the anticipation must be convincing to the audience. For the anticipation to be effective in this case, the character must keep his eyes set in exactly the direction in which he intends to run. If he does not do this, the audience will not know what he has in mind before he disappears. A perfect example of anticipation in action is a sprinter at the starting blocks. Note that as he is in the set position, and the gun goes off, he moves back slightly before moving forward on “go.”
- Anticipation will work for any action, not just a run. If a character looks | up, he should momentarily look down first. If he jumps, there should be a | little squash before he takes off. If he talks, there should be a little anticipation in the face or head before һе begins.
- If a character is going to run off-screen-left from a standing start, it is first necessary to give him a short movement to screen-right to anticipate it.
- When animating any major action in a scene, it is always necessary to anticipate the action before initiating it.
- Realistic touches
- Weight in movement
- Note how the ball tends to squash when it hits the ground—losing its round shape—then elongates as it springs up and forward. These movements are quite fast (because of the speed and momentum of the descending ball), but the movement tends to slow considerably as the ball reaches the | highest position. At this high point, the ball reestablishes its normal shape—perfectly round—before descending again, and distorting slightly once more, due to the drag caused by its acceleration. | With a much lighter ball—perhaps a ping-pong ball—the action differs.
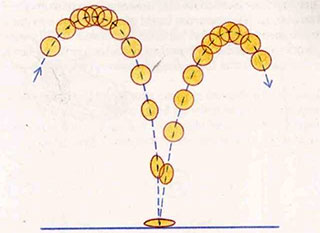
- Notice that the ball moves very fast on the bounce, yet hovers at the top of the bounce. This is because the air tends to hold the light ball up longer, and when it hits, it is easily catapulted upward again, the force of gravity hardly affecting it. On the other hand, if a heavy ball, such as a cannonball, were to bounce, there would be a very different effect.
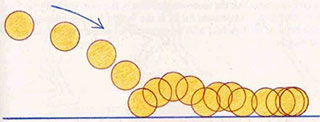
- Here the force of gravity pulls heavily on the cannonball and little bounce occurs. Instead, the ball quickly comes to rest. And, because the ball is heavy and solid, it does not lose its shape when bouncing. Indeed, it is more likely that the ground will bend before the ball. All the principles shown for the bouncing ball apply to everything that moves, and they are particularly useful for animating walks and runs.
- Note how the ball tends to squash when it hits the ground—losing its round shape—then elongates as it springs up and forward. These movements are quite fast (because of the speed and momentum of the descending ball), but the movement tends to slow considerably as the ball reaches the | highest position. At this high point, the ball reestablishes its normal shape—perfectly round—before descending again, and distorting slightly once more, due to the drag caused by its acceleration. | With a much lighter ball—perhaps a ping-pong ball—the action differs.
- Weight in movement
- Realistic touches
- Carrying a weight
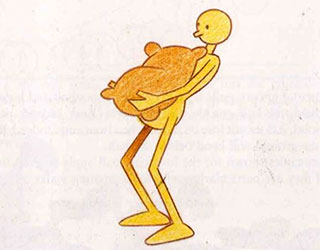
- When a character is carrying a heavy weight, his whole posture and way of moving change. A man carrying a sack of potatoes, for instance, will stand differently from a man who is empty-handed.
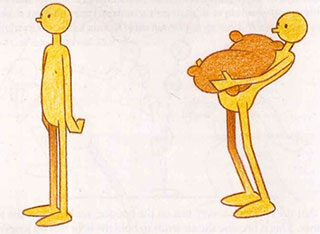
- Notice the tremendous lean backward, which is necessary to compensate for the added weight so that the character appears balanced. If the man did not lean back, he would be pulled forward and would fall flat on his face. The general rule is that the more weight there is, the more the body position has to change to compensate for it. If the weight is tremendously heavy, then a bend in the legs may also be necessary to accentuate the illusion of great weight.
- Now when the character begins to move, his speed and action are affected. The heavier the weight, the slower the movement will tend to be. In this case, the man will have to walk quite slowly because he has a great deal of extra weight to move and his muscles are not accustomed to the added load. The muscles must work much harder, against added resistance, and as a result will appear more labored in their movement.
When moving weight, it is essential to remember that the greater the weight, the greater the resistance that gravity will apply to that weight. If the man is trying to move the weight, plus his body, up and forward—as at the beginning of a step—then the initial movement will be extremely difficult and slow. When, however, he has the momentum going to move the weight, it will be easier for him to maintain, or increase, the speed. And if he is moving the weight downward, gravity will actually help him and the action will accelerate.
When walking, therefore, the man carrying the sack will start extremely slowly, and only really be able to speed up when he gains momentum. An approximate breakdown of his first step might be as follows (although this will vary, depending on the demands of the action you are attempting):

- Note, first, that this walk is extremely slow because a great weight 15 involved. Second, there tends to be a tremendous slow-out from key number 1, as the man struggles to get the weight moving. There is also a slight slow-in to key number 27 as the man, having gotten the momentum going, must attempt to slow it down to some degree as he prepares to push off on the next step. This is another feature of weight—if the character did not attempt to slow down in this way, the weight would come crashing to the ground under the force of momentum and gravity.
- Obviously, many other factors influence the action. For example, is the man big in proportion to the weight, or is he small? Or, whatever his size, is he strong or weak in his ability to handle the weight? Indeed, so many factors occur when dealing with weight in action that it is impossible to offer concrete formulas to cover every eventuality. If, however, the basic principles of weight are understood, they can be applied to a variety of situations.
What will happen to the walk if, for example, the man is carrying the sack under one arm? First, his posture will change considerably. Instead of a backward lean, he will need much more of a sideways lean to compensate for the heavy weight. His free arm is held out, to give added compensation to the extra weight, and his legs have a less symmetrical stance.
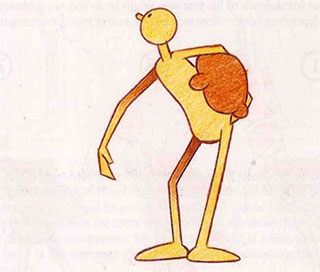
- The walk, then, will be extremely exaggerated, with a kind of dragging, limping movement—in order for the added side weight to be brought around and forward on every step that the weighted leg takes. Act it out yourself, and you will begin to get the feel of what is needed. If you can feel it, you have a far greater chance of producing it on the screen.
- When a character is carrying a heavy weight, his whole posture and way of moving change. A man carrying a sack of potatoes, for instance, will stand differently from a man who is empty-handed.
- Carrying a weight
- Realistic touches
- Anticipation and weight
- When moving great weight, remember to use anticipation. If your character is attempting to throw the sack into the back of a truck, then it will be far more convincing if he puts one, or two, little back swings in before he throws the sack forward.
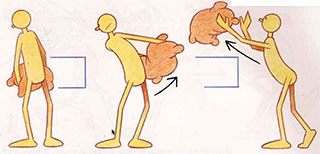
- Similarly, if a character is sitting down and has to get up and move forward, a little backward lean of the body will make it more convincing.
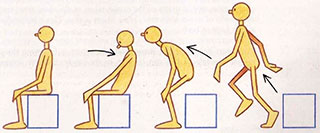
- Obviously, if the character is fat, old, ог weak, this type of anticipation will be pronounced. On the other hand, if the character is quick and nimble, the anticipation does not have to be so strong. Act the movement out before you try to animate it. Or get someone else to act it out and watch him or her a few times before you begin to draw.
- When moving great weight, remember to use anticipation. If your character is attempting to throw the sack into the back of a truck, then it will be far more convincing if he puts one, or two, little back swings in before he throws the sack forward.
- Anticipation and weight
- Realistic touches
- Flexibility
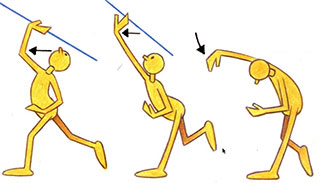
- Flexibility of the joints is essential to good animation. Stiffness is the hallmark of poor animation technique. The more flexibility that can be put into an animated movement (without the character actually looking like rubber), the more convincing it will be. A favorite phrase of older animators 1s “successive breaking of joints.” Quite simply, this means that, as in overlapping action, not all parts of the action move at the same time; instead, a succession of movements takes place in any action. This is particularly true of the human body. | When contemplating an action, the animator must first ascertain which body part is leading the action and which part is following through. A classic example of this can be seen in the javelin thrower.
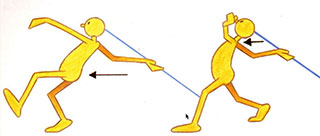
- Experienced javelin coaches always emphasize that there is more to javelin throwing than just running and throwing. Apart from the fast run up, they emphasize that at the end of the run the feet should be planted in a solid, steady position with the hips driven forward and the javelin arm held well back. From this powerful hip position, the throw unwinds from a series of movements, which bear a strong resemblance to the whip action from the center to the upper tip of an archery bow. The body arches from the hip and the shoulder moves forward, ahead of the body. Then the elbow moves forward, to be followed by the wrist. Finally, the javelin is released, with the fingertips following through at the last moment. This is a perfect example of a successive breaking of joints.
- Every action has some breaking of joints, regardless of how dynamic it is. In animation, the simple act of picking up a pencil appears far more flexible, or fluid, just by successively breaking the joints. Although the action is exaggerated in the example, observe how it goes through a series of changes of direction in the joints of the arm and hand, and the way it starts at the elbow and seems to ripple along to the hand, rather like a whip cracking.
Note, too, that after a joint has led by breaking in one direction, it immediately breaks back to allow the next joint to lead the next part of the sequence. That joint, іп turn, breaks back, making way for the next опе.
When breaking joints, however, you must always remember the limitations of human anatomy. Never overextend the bend of the joints into impossible positions. Effective animation uses successive breaking of joints to add flexibility. A less-than-subtle use of this technique, however, may render the action unbelievable. Beware of excess, unless the scene specifically demands it.
- Flexibility of the joints is essential to good animation. Stiffness is the hallmark of poor animation technique. The more flexibility that can be put into an animated movement (without the character actually looking like rubber), the more convincing it will be. A favorite phrase of older animators 1s “successive breaking of joints.” Quite simply, this means that, as in overlapping action, not all parts of the action move at the same time; instead, a succession of movements takes place in any action. This is particularly true of the human body. | When contemplating an action, the animator must first ascertain which body part is leading the action and which part is following through. A classic example of this can be seen in the javelin thrower.
- Flexibility
- Realistic touches
- Overlapping action
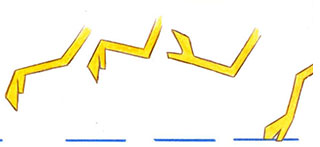
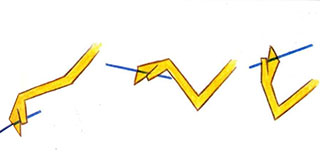
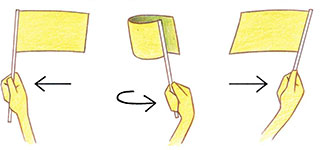
- In addition to weight, you must consider overlapping action, which is the effect of a main movement on parts that are secondary to the main movement. If, for example, a hand is waving a flag, the moving hand is the main action, but the flag follows on, secondary to it. If the hand changes direction, the flag continues along its path of movement until it reaches its full length, then it again follows the hand, until the movement changes.
- Overlapping applies to almost everything and can be used to great effect in all animation scenes. Clothing, for instance, provides an excellent example of overlapping action. If a character wearing a coat is walking along, the coat will seem to drag against the direction in which the character is walking. If the character suddenly stops, the coat will tend to continue, then slowly fall back into a static position. Hair, scarves, floppy sweaters— anything that is free-moving yet attached to the main body of movement— may move as a result of overlapping action.
- In addition to weight, you must consider overlapping action, which is the effect of a main movement on parts that are secondary to the main movement. If, for example, a hand is waving a flag, the moving hand is the main action, but the flag follows on, secondary to it. If the hand changes direction, the flag continues along its path of movement until it reaches its full length, then it again follows the hand, until the movement changes.
- Overlapping action
- Animating animals
- Birds
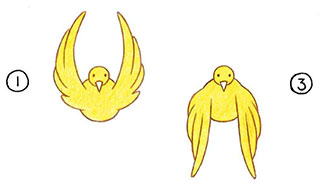
- Bird wing positions: There are traditionally four basic positions for a flying bird. The two most obvious are the wings-up and wings-down positions.
- The breakdown positions, however, are not as straightforward. The traditional positionings of the breakdown drawings are:
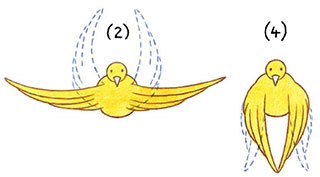
- Note the concave curve on Ше downward wing (2), as the wing tips drag | against the air resistance of the downward thrust. When the wing reverses | its direction upward again, there is a reversed curve, as the wing tips are dragged downward by the air resistance. These simple principles give a sense of flexibility and snap to the wings. Although this simplified action is appropriate only for cartoon birds, the |. principle does apply in general terms to realistic flight patterns. Note the | wing movements in the sequence of photographs by Eadweard Muybridge below (shown in profile and frontally). Position 6 represents the wings-up position, and position 3 the wings-down position. Both positions 1 and 2 could be described as breakdown positions on the downward flap, and you can see the concave curve made by the drag on the wing tips, particularly in position 2. In real life, however, the wings do not simply curve back the other way when they are on the way up, as they do in cartoon action. Instead, in real life, the structural anatomy of the wings must be taken into account. Observe the pronounced bend in the shape of the wings in position 4, which is really the breakdown position. Position 5, which constitutes the inbetween between 4 and 6, also has a bit of a convex curve, with the wing tips held down slightly. The shape of the wings then immediately reverses in position 6, as the movement begins to be directed down again. Another important thing about bird flight is that due to the force of the wings against the air, the body is pushed slightly upward on the downward flap. Then, when the wings return upward again, the body drops slightly, resulting in a slight up-and-down movement of the bird's body as it flies along. With large, long-necked birds, such as swans and pelicans, there may also be an additional back-and-forth movement of the head, with the head and neck stretching on the downward flap and contracting when the wings are raised.
- Timing in bird hights:
When animating bird flight, timing is essential for interpreting the size, personality, and nature of the bird. The dignity of an eagle in flight, for example, would be totally destroyed by the fast, jerky movements of a sparrow in flight. And the slow, powerful beats of the eagle’s wings would be equally inappropriate for the sparrow. As a general rule, the larger the bird, the slower the action, and the smaller the bird, the faster the action. Also, the larger the wings, the more evident the up-and-down movement of the body will be. The smaller the wings, the less impact they will have on the body’s movements. It can be seen from Muybridge’s photographs that the average pigeon flap is about six positions (shot on ones), but this must be varied according to the requirements of the scene. For a tiny bird, like a sparrow, a fourframe action might do. The one exception to all of this is the hummingbird, whose wings move so fast that they cannot be captured by even one frame of film. In this case, the only way that the wing effect can be simulated is by using blurs. Instead of defining any wing shapes, the animator substitutes a blurred shape, which suggests the wing movements.
- Generally, these blurs should be either above or below the horizontal center line, but they should vary considerably so that no repeatable pattern can be seen. If, for example, the hummingbird is hovering on the spot, as hummingbirds tend to do, then perhaps eight to twelve blurred overlays (half above, half below the center line) can be shot at random on ones. This will offer a great variety of alternative combinations of cels and will simulate the fast action of the wings. If you repeat drawings in this way, however, you must make sure that you re-dope each drawing at least four frames apart; otherwise, a flicker will occur, due to a kind of after-image and the idiosyncrasies of film optics. This blurring is best done with an airbrush ог drybrush painting technique, rather than a drawn series of lines sketched in over the animation cel, which tends to look cheap and unattractive.
- Bird wing positions: There are traditionally four basic positions for a flying bird. The two most obvious are the wings-up and wings-down positions.
- Birds
- Animating animals
- Butterflies
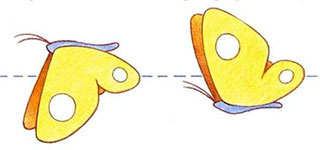
- The blurred-wing technique is obviously ideal for the fast wing movements | of all insects. For butterflies, however, a different technique can be used. Basically, the butterfly’s wing movement can be achieved by two drawings, one with the wings up and the other with the wings down.
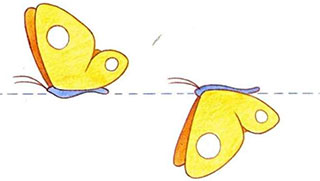
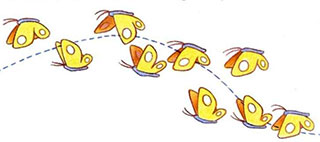
- The animator can, of course, vary the amount of up and down from drawing to drawing. Indeed, a butterfly’s action is distinguished by its erratic flight path. Butterflies appear to flit and dance all over the place, although they usually seem to be headed in one general direction. The golden rule when animating butterflies is that—because of the extreme lightness of their bodies—whenever the wings flap down, the body moves up dramatically, and whenever the wings flap up, the body moves down dramatically.
- The degree of up and down of the body is decided by the individual animator, although it should be as irregular as possible and not at all repetitive. Indeed, the best way to animate butterflies is to sketch out a general path of action, then draw in, straight ahead, each consecutive drawing, judging the movement intuitively. In other words, you do not use keys and inbetweens, but animate one drawing directly after another.
- The blurred-wing technique is obviously ideal for the fast wing movements | of all insects. For butterflies, however, a different technique can be used. Basically, the butterfly’s wing movement can be achieved by two drawings, one with the wings up and the other with the wings down.
- Butterflies
- Animating animals
- Four-legged animals
- Human walks are difficult enough, but when you double the number of legs, you double the problems. If, however, four-legged walks are approached from the cartoon point of view, then the solution becomes clearer—as long as the basic principles of standard human walks have already been mastered. Basically, the walk of the cartoon horse can be divided into two independent human walks, one for the front legs (A) and one for the back legs (B).
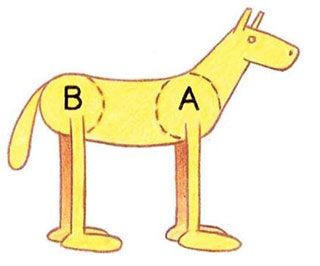
- To get the horse to move, first animate the front legs (A) as in the human walk, at the speed and in the manner you want them to go. Then repeat the same thing with the back legs (B). Make sure, however, that the ground covered by the back legs is the same as that covered by the front legs; otherwise, the body will seem to stretch apart, or fold up like an accordion (which might be amusing, if done consciously). All the rules about up-anddown movement of the body apply, of course. When walking four legs together, it is also necessary to ascertain how the action of the front legs will synchronize with the action of the back legs. A brief look at Muybridge's photographs of a moving horse shows that, essentially, when the front right leg is forward, the back right leg is back | (position 1) and when the front right leg is back, the back right leg 15 forward. Of course, this is an oversimplification of what is going on, but, for cartoon purposes, it is a good starting point.
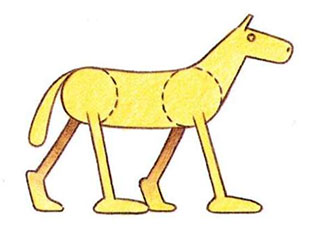
- Rules, however, аге made to be broken, and the funniest cartoon walks сап be achieved by totally disregarding the rules. What if the back right leg moves forward at the same time as the front right leg?
- Or if the front legs move normally but the back legs have a double-bounce?
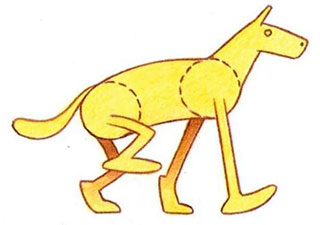
- The variations are endless. In cartoon four-legged walks, as with all anima- | tion, it is the animator’s imagination that makes the action work successfully. With the great variation of up-and-down movements and leg actions available in walks, there should be every opportunity to come up with something totally original for a four-legged walk.
After the legs and linking body are completed, it is a simple matter to add the head and tail. The head and neck will react to the general action of the front legs, so normally you might expect to see the head move up as the shoulders move down, and down as the shoulders move up again. In the same way, the tail tends to flick down as the haunches move up, and up as the haunches go down. But since rules are made to be broken, you can and should use your imagination to bring some originality into the action.
When, however, we move out of the realm of cartoon four-legged walks, and into the realistic world, the problems are accentuated. A careful study of the way the animal moves must be made because absolute authenticity is demanded. Animals in Motion, Eadweard Muybridge’s book of sequenced photographs, is an invaluable source of reference material and a must for all animators who care enough to get the most out of their craft. A study of the sequence illustrated above will reveal a great deal about timing and action in relation to the walking horse. But, however complicated the action appears, all the principles of movement previously explained still apply.
As Art Babbit, the great ex-Disney animator, once said, all the animator has to do is “observe, analyze, file it, and interpret it.” When interpreting real-life action, however, it is necessary to caricature it to some extent, by exaggerating the observed action. This is the reason that, when live-action film is simply traced (rotascoped) and then put on animation cel and shot, the action is dull and wooden. (Critics of modern animation directors will appreciate this point.) It is only by caricaturing the movement, and applying all the principles previously explained, that the action will come alive. Anything else is cheating and does little service to the fine tradition of drawn animation.
- Human walks are difficult enough, but when you double the number of legs, you double the problems. If, however, four-legged walks are approached from the cartoon point of view, then the solution becomes clearer—as long as the basic principles of standard human walks have already been mastered. Basically, the walk of the cartoon horse can be divided into two independent human walks, one for the front legs (A) and one for the back legs (B).
- Four-legged animals
- Animating animals
- Tips on animating animals
- Tips on animating animals
- The characteristics of animals, like the personalities of humans, vary so | much that no simple formulas can be given. Is the animal heavy or light? Is | it slow and laborious, or jumpy and nervous? Is it carrying а weight оп its back, or is it free of restriction? Such variables as these are important to think about before you begin animating the movement. Your own observation and analysis will teach you how to achieve a particular objective. A few simple tips, however, may prove useful.
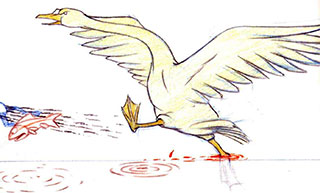
- ГІ Heavy waterbirds tend to need a run before they can take off for flight.
- ГІ Large birds tend to glide in the air a lot and usually need only a minimum of flaps to remain airborne once they have achieved altitude.
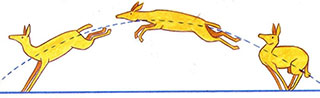
- ГІ When an animal is leaping, there is a curved line to the body as the animal strides and lands.
- When animating а horse, or any other animal, realistically, it is helpful to | rough out the action in simple boxes representing the main body mass. After the space and action for this are achieved, the legs, and then the head and tail, can be drawn. This is best drawn lightly and roughly until the action is acceptable; it can be cleaned up afterward.
- Small rodents, like mice, do not generally need much up-and-down body movement. It is a simple procedure to animate the body moving fast across the scene in a fairly straight line, adding scurrying afterward to complete the effect. |
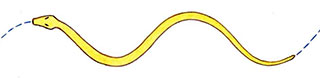
- Snakes tend to slither along a wavy path of action, with little or no body action.
- For the bounce of a kangaroo, use the bouncing-ball principle. Contact with the ground should be kept to a minimum, with the greatest emphasis on the slow-in and slow-out drawings at the height of the bounce.
- On all cat springs there should be a slow windup before the spring (anticipation), a sudden spring, and a slight slow-in at the top of the leap. (Keep in mind the sprinter’s start on page 70.)
- Afterword
- With technological advances, the world of animation is of course changing. Today, it is repeatedly suggested that the greatest development in animation is the computer-generated image. Indeed, so much is calimed for the oncehumble computer that it may seem tempting for animators to put down their pencils and let the machines take over. Time and time again, we are told that the age of drawn animation is over, and that the age of the computer is upon us. The self-respect and confidence of animators appear to be at an all-time low, as they slink away from the fray, with huge silicon chips on their shoulders. At the same time there is little doubt that the new computer-based technology can find a genuine place in the field of traditional animation, and animators ignore its potential at their peril. Without doubt, computergenerated images are superior in certain aspects of animation, and richly deserve the respect they are now given. Three-dimensional solid objects, for example, can be fairly easy (and often dramatically) turned and moved by the computer animator—sometimes, even more economically than by their traditional counterparts. Animated graphics, lettering, and symbols are other examples of the kind of images that can be better animated on the computer screen. In acknowledging our debt to the computer, however, let us not go too far and dismiss the real value of drawn animation. Without the varied idiosyncrasies of a human personality, the computer is incapable of giving a living spirit to its creatios, and this is the secret ingredient of all great animation. As long as audiences continue to want subtle, sophisticated, and entertaining character animation—where we actually believe that the drawings we see are alive and real—then the role of drawn animation in filmmaking is assured. This workbook is a confirmation of my belief that there is still life in the old tradition of drawn animation. The principles outlined are only the foundations of an apprenticeship, which takes a working lifetime to learn and perfect. No book, however complex or thorough, can ever teach all that there is to learn about any subject. Nevertheless, this workbook should provide the basic information for you to move forward on your own, to discover new and exciting landmarks. It is in your hands, and the hands of your successors, that the craft and tradition of drawn animation firmly rest, and I wish you well with this challenge.
- With technological advances, the world of animation is of course changing. Today, it is repeatedly suggested that the greatest development in animation is the computer-generated image. Indeed, so much is calimed for the oncehumble computer that it may seem tempting for animators to put down their pencils and let the machines take over. Time and time again, we are told that the age of drawn animation is over, and that the age of the computer is upon us. The self-respect and confidence of animators appear to be at an all-time low, as they slink away from the fray, with huge silicon chips on their shoulders. At the same time there is little doubt that the new computer-based technology can find a genuine place in the field of traditional animation, and animators ignore its potential at their peril. Without doubt, computergenerated images are superior in certain aspects of animation, and richly deserve the respect they are now given. Three-dimensional solid objects, for example, can be fairly easy (and often dramatically) turned and moved by the computer animator—sometimes, even more economically than by their traditional counterparts. Animated graphics, lettering, and symbols are other examples of the kind of images that can be better animated on the computer screen. In acknowledging our debt to the computer, however, let us not go too far and dismiss the real value of drawn animation. Without the varied idiosyncrasies of a human personality, the computer is incapable of giving a living spirit to its creatios, and this is the secret ingredient of all great animation. As long as audiences continue to want subtle, sophisticated, and entertaining character animation—where we actually believe that the drawings we see are alive and real—then the role of drawn animation in filmmaking is assured. This workbook is a confirmation of my belief that there is still life in the old tradition of drawn animation. The principles outlined are only the foundations of an apprenticeship, which takes a working lifetime to learn and perfect. No book, however complex or thorough, can ever teach all that there is to learn about any subject. Nevertheless, this workbook should provide the basic information for you to move forward on your own, to discover new and exciting landmarks. It is in your hands, and the hands of your successors, that the craft and tradition of drawn animation firmly rest, and I wish you well with this challenge.
- Embrace Continuous Motion and Pacing
- Unlike a slideshow that jumps from one static image to the next, effective animation uses continuous, purposeful motion to maintain audience attention and immersion.
- Integrated Transitions:
- Instead of stark cuts between slides, use seamless transitions. One scene should flow logically into the next, using camera movements like pans, zooms, or character actions to guide the viewer's eye and maintain narrative continuity.
- Instead of stark cuts between slides, use seamless transitions. One scene should flow logically into the next, using camera movements like pans, zooms, or character actions to guide the viewer's eye and maintain narrative continuity.
- Dynamic Pacing:
- Control the flow of time. Quick cuts and rapid movements build tension or excitement, while slow, deliberate movements can evoke contemplation or sadness. A slideshow's pace is often dictated by the presenter's manual clicks, but animation's timing is precisely controlled within the medium itself.
- Control the flow of time. Quick cuts and rapid movements build tension or excitement, while slow, deliberate movements can evoke contemplation or sadness. A slideshow's pace is often dictated by the presenter's manual clicks, but animation's timing is precisely controlled within the medium itself.
- "Alive" Backgrounds:
- Even background elements should have subtle motion (e.g., leaves rustling, clouds moving). This creates a living, breathing world, making the audience feel present within the story, a far cry from a static background image on a slide.
- Even background elements should have subtle motion (e.g., leaves rustling, clouds moving). This creates a living, breathing world, making the audience feel present within the story, a far cry from a static background image on a slide.
- Leverage the Uniqueness of Animated Visuals
- Animation can depict actions and emotions in ways that static visuals or even live-action film cannot, using exaggeration and creative license.
- Exaggerated Expressions and Pantomime:
- Emotions are conveyed through exaggerated facial expressions, body language, and physical comedy (pantomime). This allows for a universal emotional language that works without dialogue and adds a layer of depth a static image cannot match.
- Emotions are conveyed through exaggerated facial expressions, body language, and physical comedy (pantomime). This allows for a universal emotional language that works without dialogue and adds a layer of depth a static image cannot match.
- Visual Metaphors and Symbolism:
- Abstract concepts, internal struggles, or complex ideas can be represented through powerful, changing visual metaphors (e.g., a character physically shrinking when feeling insignificant, or a color palette shifting from warm to cool to reflect a change in mood).
- Abstract concepts, internal struggles, or complex ideas can be represented through powerful, changing visual metaphors (e.g., a character physically shrinking when feeling insignificant, or a color palette shifting from warm to cool to reflect a change in mood).
- Composition and Perspective:
- Utilize dynamic camera angles. A low angle looking up at a character makes them feel powerful, while a high angle looking down makes them seem vulnerable. These cinematic techniques provide emotional context that a fixed presentation slide cannot offer.
- Utilize dynamic camera angles. A low angle looking up at a character makes them feel powerful, while a high angle looking down makes them seem vulnerable. These cinematic techniques provide emotional context that a fixed presentation slide cannot offer.
- Animation can depict actions and emotions in ways that static visuals or even live-action film cannot, using exaggeration and creative license.
- Weave Audio and Visuals Seamlessly
- The story in animation is a cohesive experience, not just pictures with accompanying sound.
- Integrated Sound Design:
- Music, sound effects, and voice acting are integral parts of the storytelling, synchronized perfectly with the visuals to build atmosphere and emotional resonance. They do not just "play alongside" the visuals; they are part of the narrative.
- Music, sound effects, and voice acting are integral parts of the storytelling, synchronized perfectly with the visuals to build atmosphere and emotional resonance. They do not just "play alongside" the visuals; they are part of the narrative.
- Character Arcs Through Movement:
- A character's entire journey, from their initial state to their final transformation, can be visually represented through subtle changes in their movement style, design, or color palette over time.
- This continuous development is a core strength of animation that contrasts sharply with the snapshot-like nature of a slideshow presentation.
- A character's entire journey, from their initial state to their final transformation, can be visually represented through subtle changes in their movement style, design, or color palette over time.
- The story in animation is a cohesive experience, not just pictures with accompanying sound.