In Maya, modeling refers to the process of creating virtual 3D surfaces for the characters and objects in the Maya scene. Modeling is a process requiring keen visual skills and mastery of the modeling tools. The more accurate you are when modeling your forms in terms of size, shape, detail, and proportion, the more convincing your final scene will be.
- Types of modeling techniques
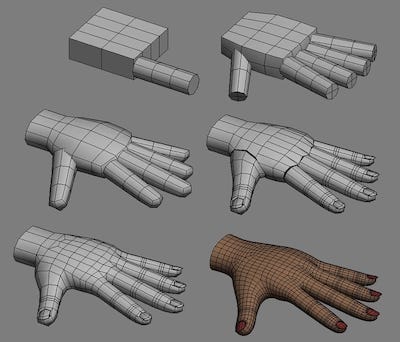
- Box modeling: Box modeling is a technique in 3D modeling where a primitive shape (such as a box, cylinder, sphere, etc.) is used to make the final model.
- Box modeling: Box modeling is a technique in 3D modeling where a primitive shape (such as a box, cylinder, sphere, etc.) is used to make the final model.
- NURBS (Non-Uniform Rational B-Splines):
Non-uniform rational basis spline is a mathematical model commonly used in computer graphics for generating and representing curves and surfaces. The shape of the surface is determined by control points.
NURBS are useful for constructing many types of organic 3D forms because of the smooth and minimal nature of the curves they use to construct surfaces. NURBS are widely used in the fields of animation, games, scientific visualization, and industrial design.
- Digital sculpting:
Also known as "sculpt modeling" or "3D sculpting", digital sculpting is the use of software that offers tools to push, pull, smooth, grab, pinch or otherwise manipulate a digital object as if it were made of a real-life substance such as clay.
- The Essentials of Maya Modeling
- Menu sets > Modeling
- Attribute Editor: Gives every object you create a descriptive name so that you can find them easily and quickly when needed.
- To create a primitive 3D object
- From the Main Menu Bar, select Create > Polygon Primitives > Cube.
- Maya creates a 3D cube primitive object and places it at the center (origin) of the Maya workspace.
- Shift + RMB
- Interactive Creation
- Manipulator: press "t" or Modify > Transformation Tools > Show Manipulator Tool
- Polygon component selection: right click on object to bring up selection menu
- Select objects and parts of objects
- Vertices, Edges and Faces
- Lasso tool
- Paint Selection tool
- To select multiple Edges: select an edge then double click on it.
- Delete Edges or Vertices: Command + Delete
- Channel box: reshape and edit objects. Shapes > Inputs - Wdith Height, Depth. *MMB
- Modeling Toolkit
- Edit Mesh: Add Divisions, Bevel, Bridge, Extrude
- Mesh Tools: Multi-cut, Insert Edge Loop
- Pivot Points
- To move a pivot point: Move tool > d > reposition the pivot to desirable position.
- To bring it back to its original position: Modify > Center pivot
- Outliner
- Hierarchies & parenting
- Hierarchies & parenting
- To duplcate objects: Command + d
- Snap to grids: hold down 'x' +
- Snap to points: hold down 'v' +
- Backface Culling
- Mesh display > Reverse
- Display > Polygons > Backface Culling
- Isolate Selection
- Shift + i
- Shift + i
- Heads Up Display
- Object Details & Poly Count
- Object Details & Poly Count
- Freeze Transformations: make the selected object's current transformations be the zero position.
- Modify > Freeze Transformations
- Modify > Freeze Transformations
- Display Layer: "V", "P", and "T" in the Display Layer Editor
- The V P and T boxes that appear beside each layer name are view settings you can switch on and off.
- V Shows or hides a layer
- A "P" in the box means that the layer is visible during playback. Turn off the "P" to hide the layer during playback.
- A “T” means the objects in the layer are templated: they are displayed in wireframe and can't be selected.
- An “R” means that the objects the layer is referenced: they can't be selected.
- A blank box means the objects in the layer are normal and can be selected.
- Timeline & keyframing
- Materials (shaders)
- Menu sets > Modeling