

INTRODUCTION
The analytical stage of forensic anthropology involves answering questions that lead to identification of the individual whose remains are being examined. The questions asked in developing a biological or demographic profile for an individual include the following:
OBJECTIVES
READINGS
TERMS
USING OSTEOMETRIC MEASURING DEVICES
You will be using several osteometric measuring devices to complete this lab. Carefully follow the directions for using these devices to insure that instruments and bones are not damaged. Osteometric equipment is expensive because of the precision with which they are manufactured; special care in using the equipment must be exercised at all times. All measurements must be made in metric units. Ask for help reading the instruments, if needed.
Sliding Caliper
The sliding caliper is used to make linear measurements on bones. We are using manual calipers and digital sliding calipers that run on batteries. Each student should practice using both types of calipers. The level of accuracy is 0.1 mm for the manual and digital calipers.
MANUAL SLIDING CALIPER
DIGITAL SLIDING CALIPER
The spreading caliper is used to make linear measurements around the protrusions on the skull. The level of accuracy is 1 mm but you can estimate to 0.1 mm.
GENERAL INSTRUCTIONS
Carefully handle the instructional casts and bones laid out in the lab, being sure to keep the bones with their labels. Some of the ends of the bones where you will be making measurements are very delicate and will degrade if handled improperly. Keep the materials on the bubble wrap to cushion them from the hard table surfaces, and wear gloves when working with real bones.
Record your responses to the questions in pencil on the answer sheet
provided
in the lab.
Work as a small group with the skulls, since we have a limited number of skulls. Each group will be given a time limit with each skull specimen.
When working in a group, it is essential that all group members look at the bones and make the measurements.
Use reference books in the lab as needed. Ask the instructor or assistant if you don't understand something.
The lab is due on Thursday, March 27 at the
beginning of class.
Late labs will not be accepted.
RACE DETERMINATION
Patterns of geographic variation of the human skeleton are used to identify the race or ancestry of an individual. Most forensic anthropologists use a three-race model that includes Mongoloid, Negroid, and Caucasoid races. Native Americans are typically included in the Mongoloid race.
Compared to sex, age, and stature estimation, race determination is "more difficult, less precise, and less reliable" because "no human skeletal markers ... correspond perfectly to geographic origin" (White 1991:328-329). In addition, many skeletal indicators used to estimate race are nonmetric traits, whose documentation through anthroposcopic methods can be somewhat subjective, varying for researcher to researcher. However, race estimation is a critical endeavor in forensic identification as sex, age, and stature estimation are greatly influenced the race of the individual.
Skeletal indicators of race focus primarily on skull and dental traits. Racial indicators on the skull are both nonmetric and metric traits and include robusticity, lengths and widths of skull features, shapes of skull features, and unique population-specific dental features.
The Giles-Elliott method is a quantitative means of estimating race based on the skull, but we will not be using this approach for our lab assignment; this method will be demonstrated if you undertake research with the instructor at a future date. Postcranial skeletal elements used in race estimation include the femur, tibia, coxa, scapula, rib, and calcaneus. In this lab, however, we will be examining only skull racial indicators.
The following drawings illustrate some of the skull differences
among
the three major human races.
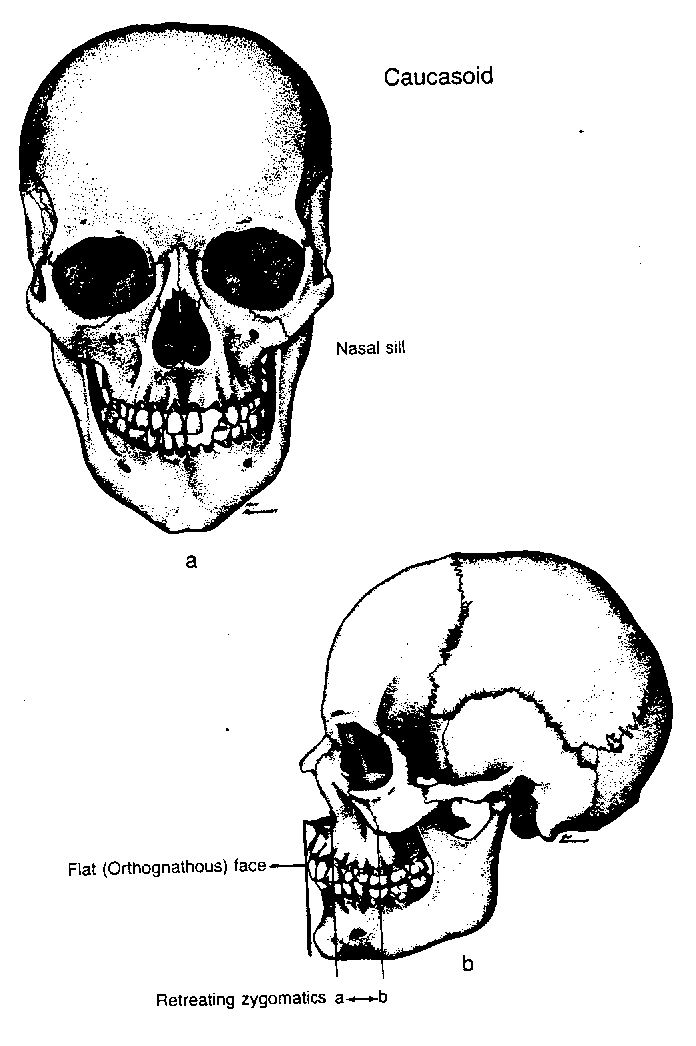
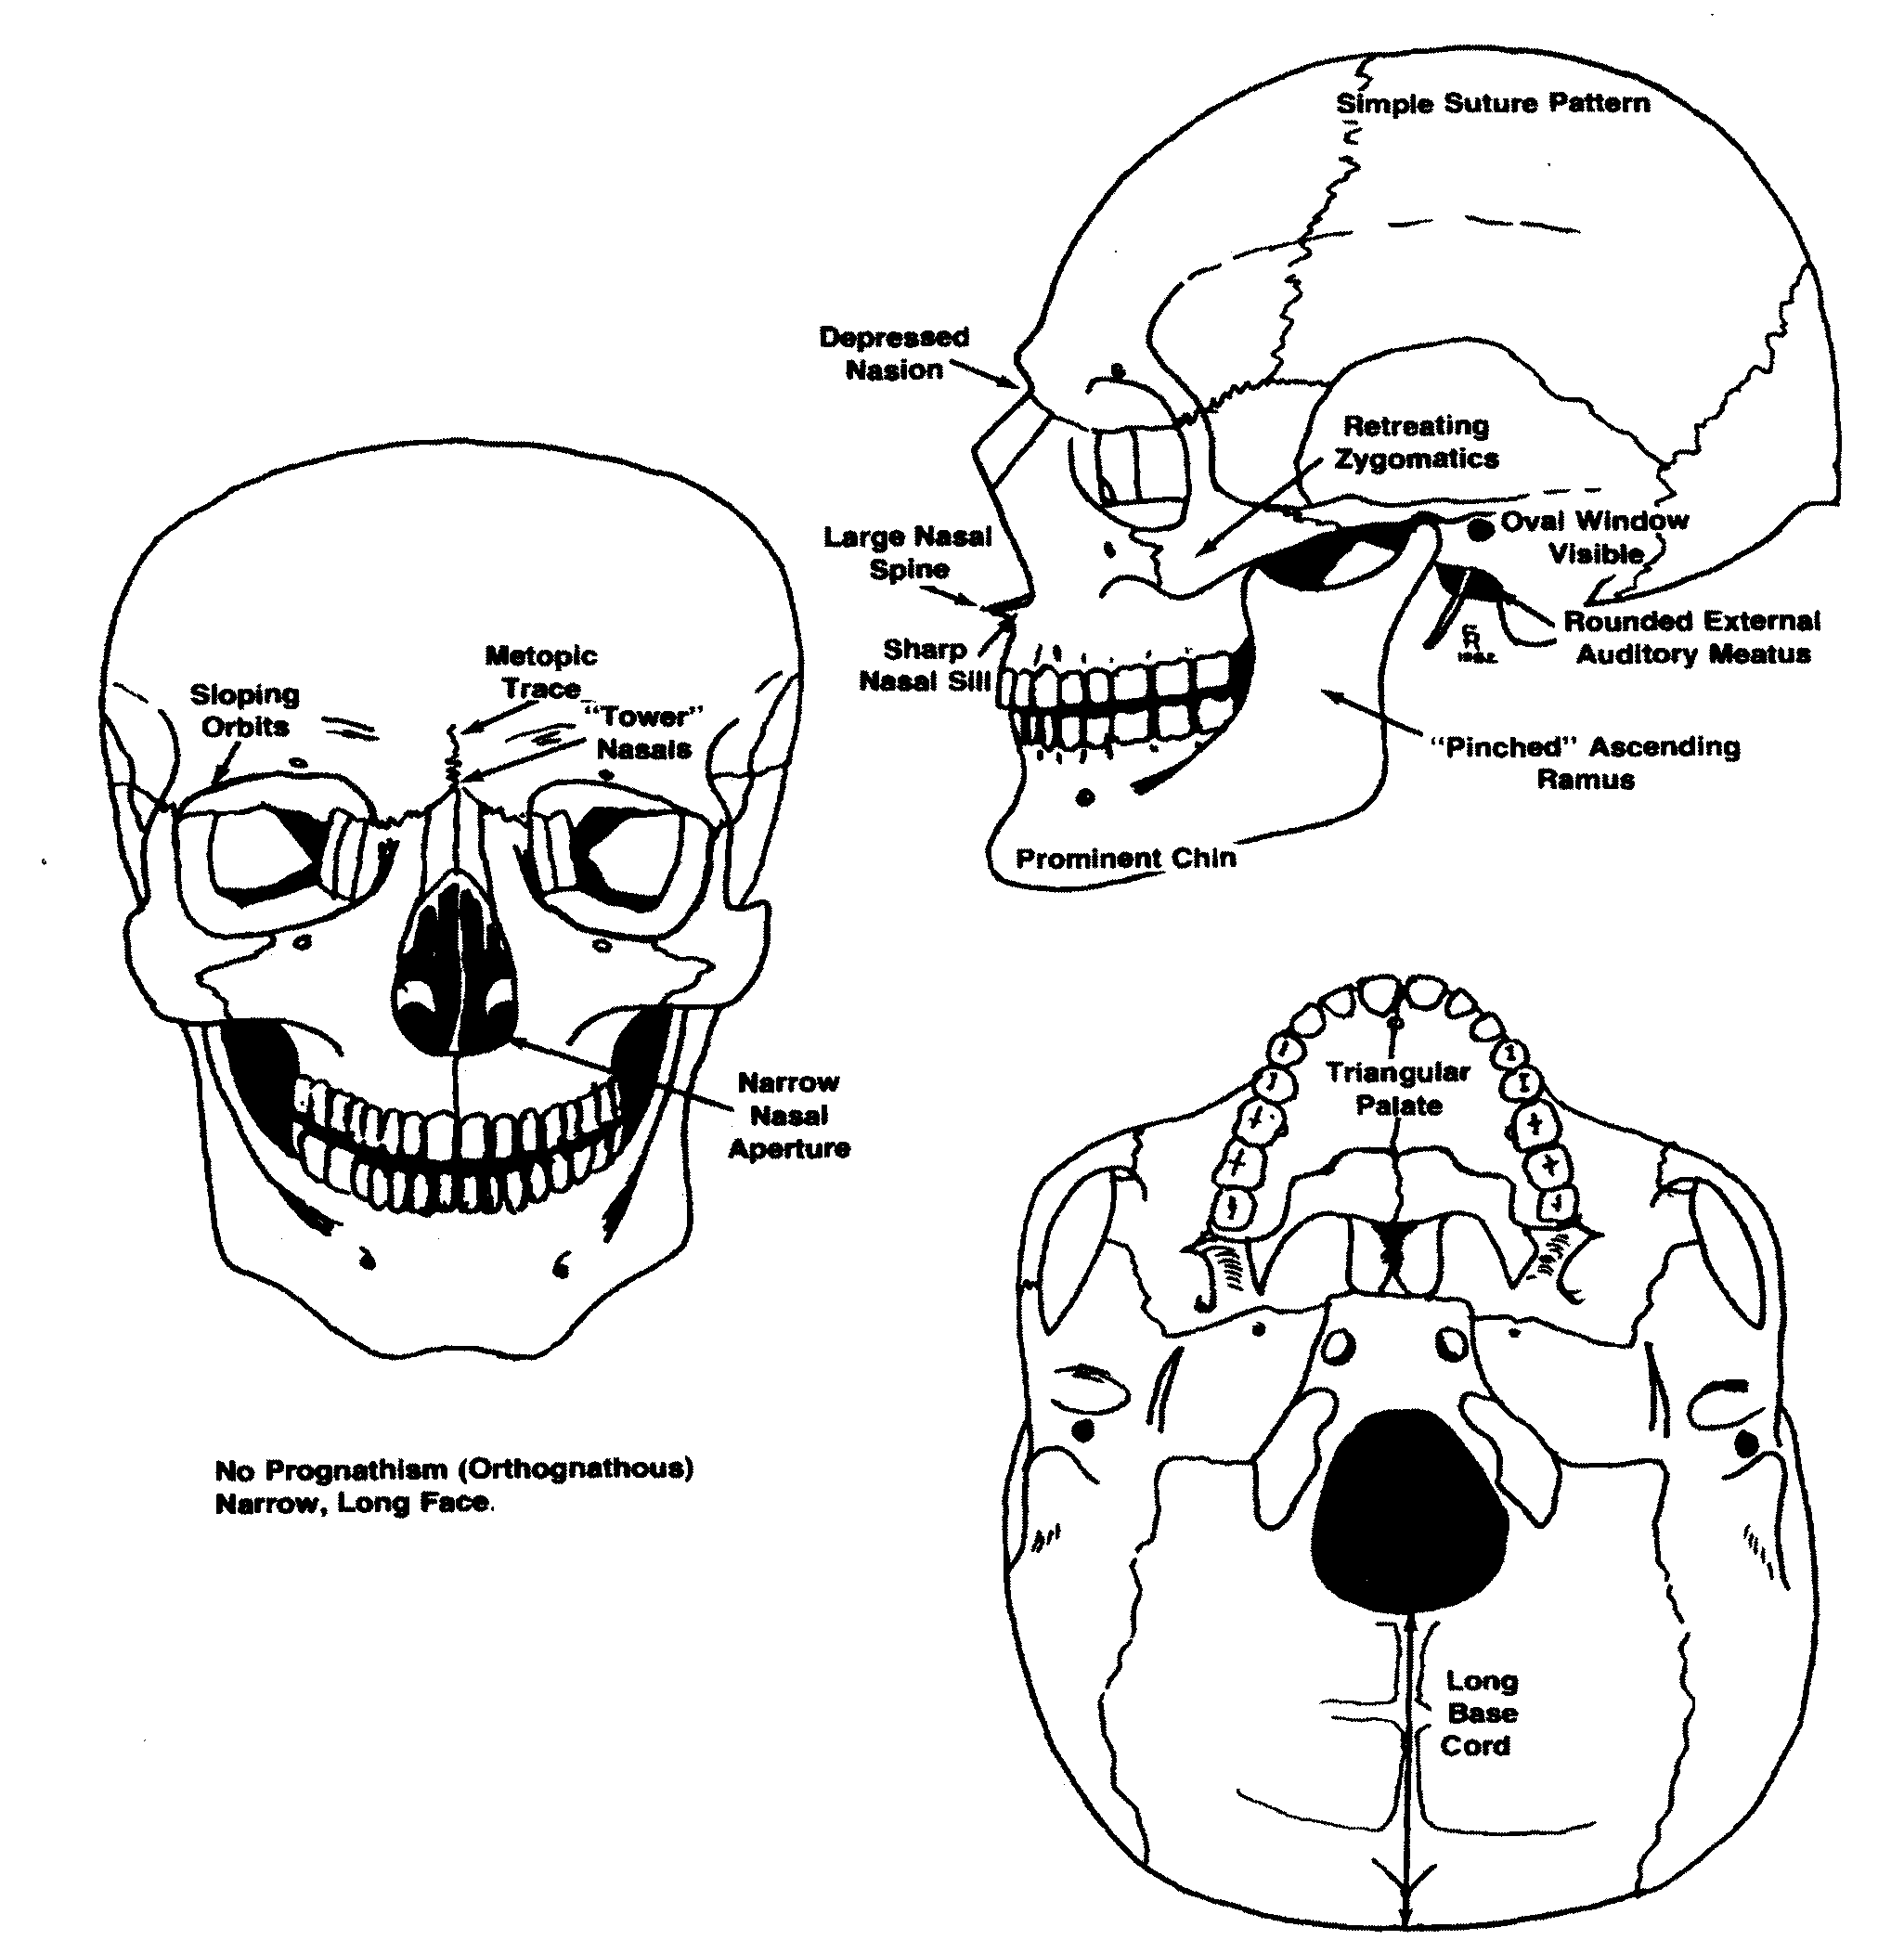
Caucasoid skull drawings (left from Bass 1986:84, right from France
2003:239).
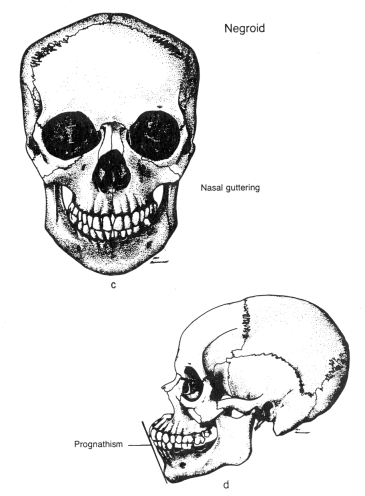
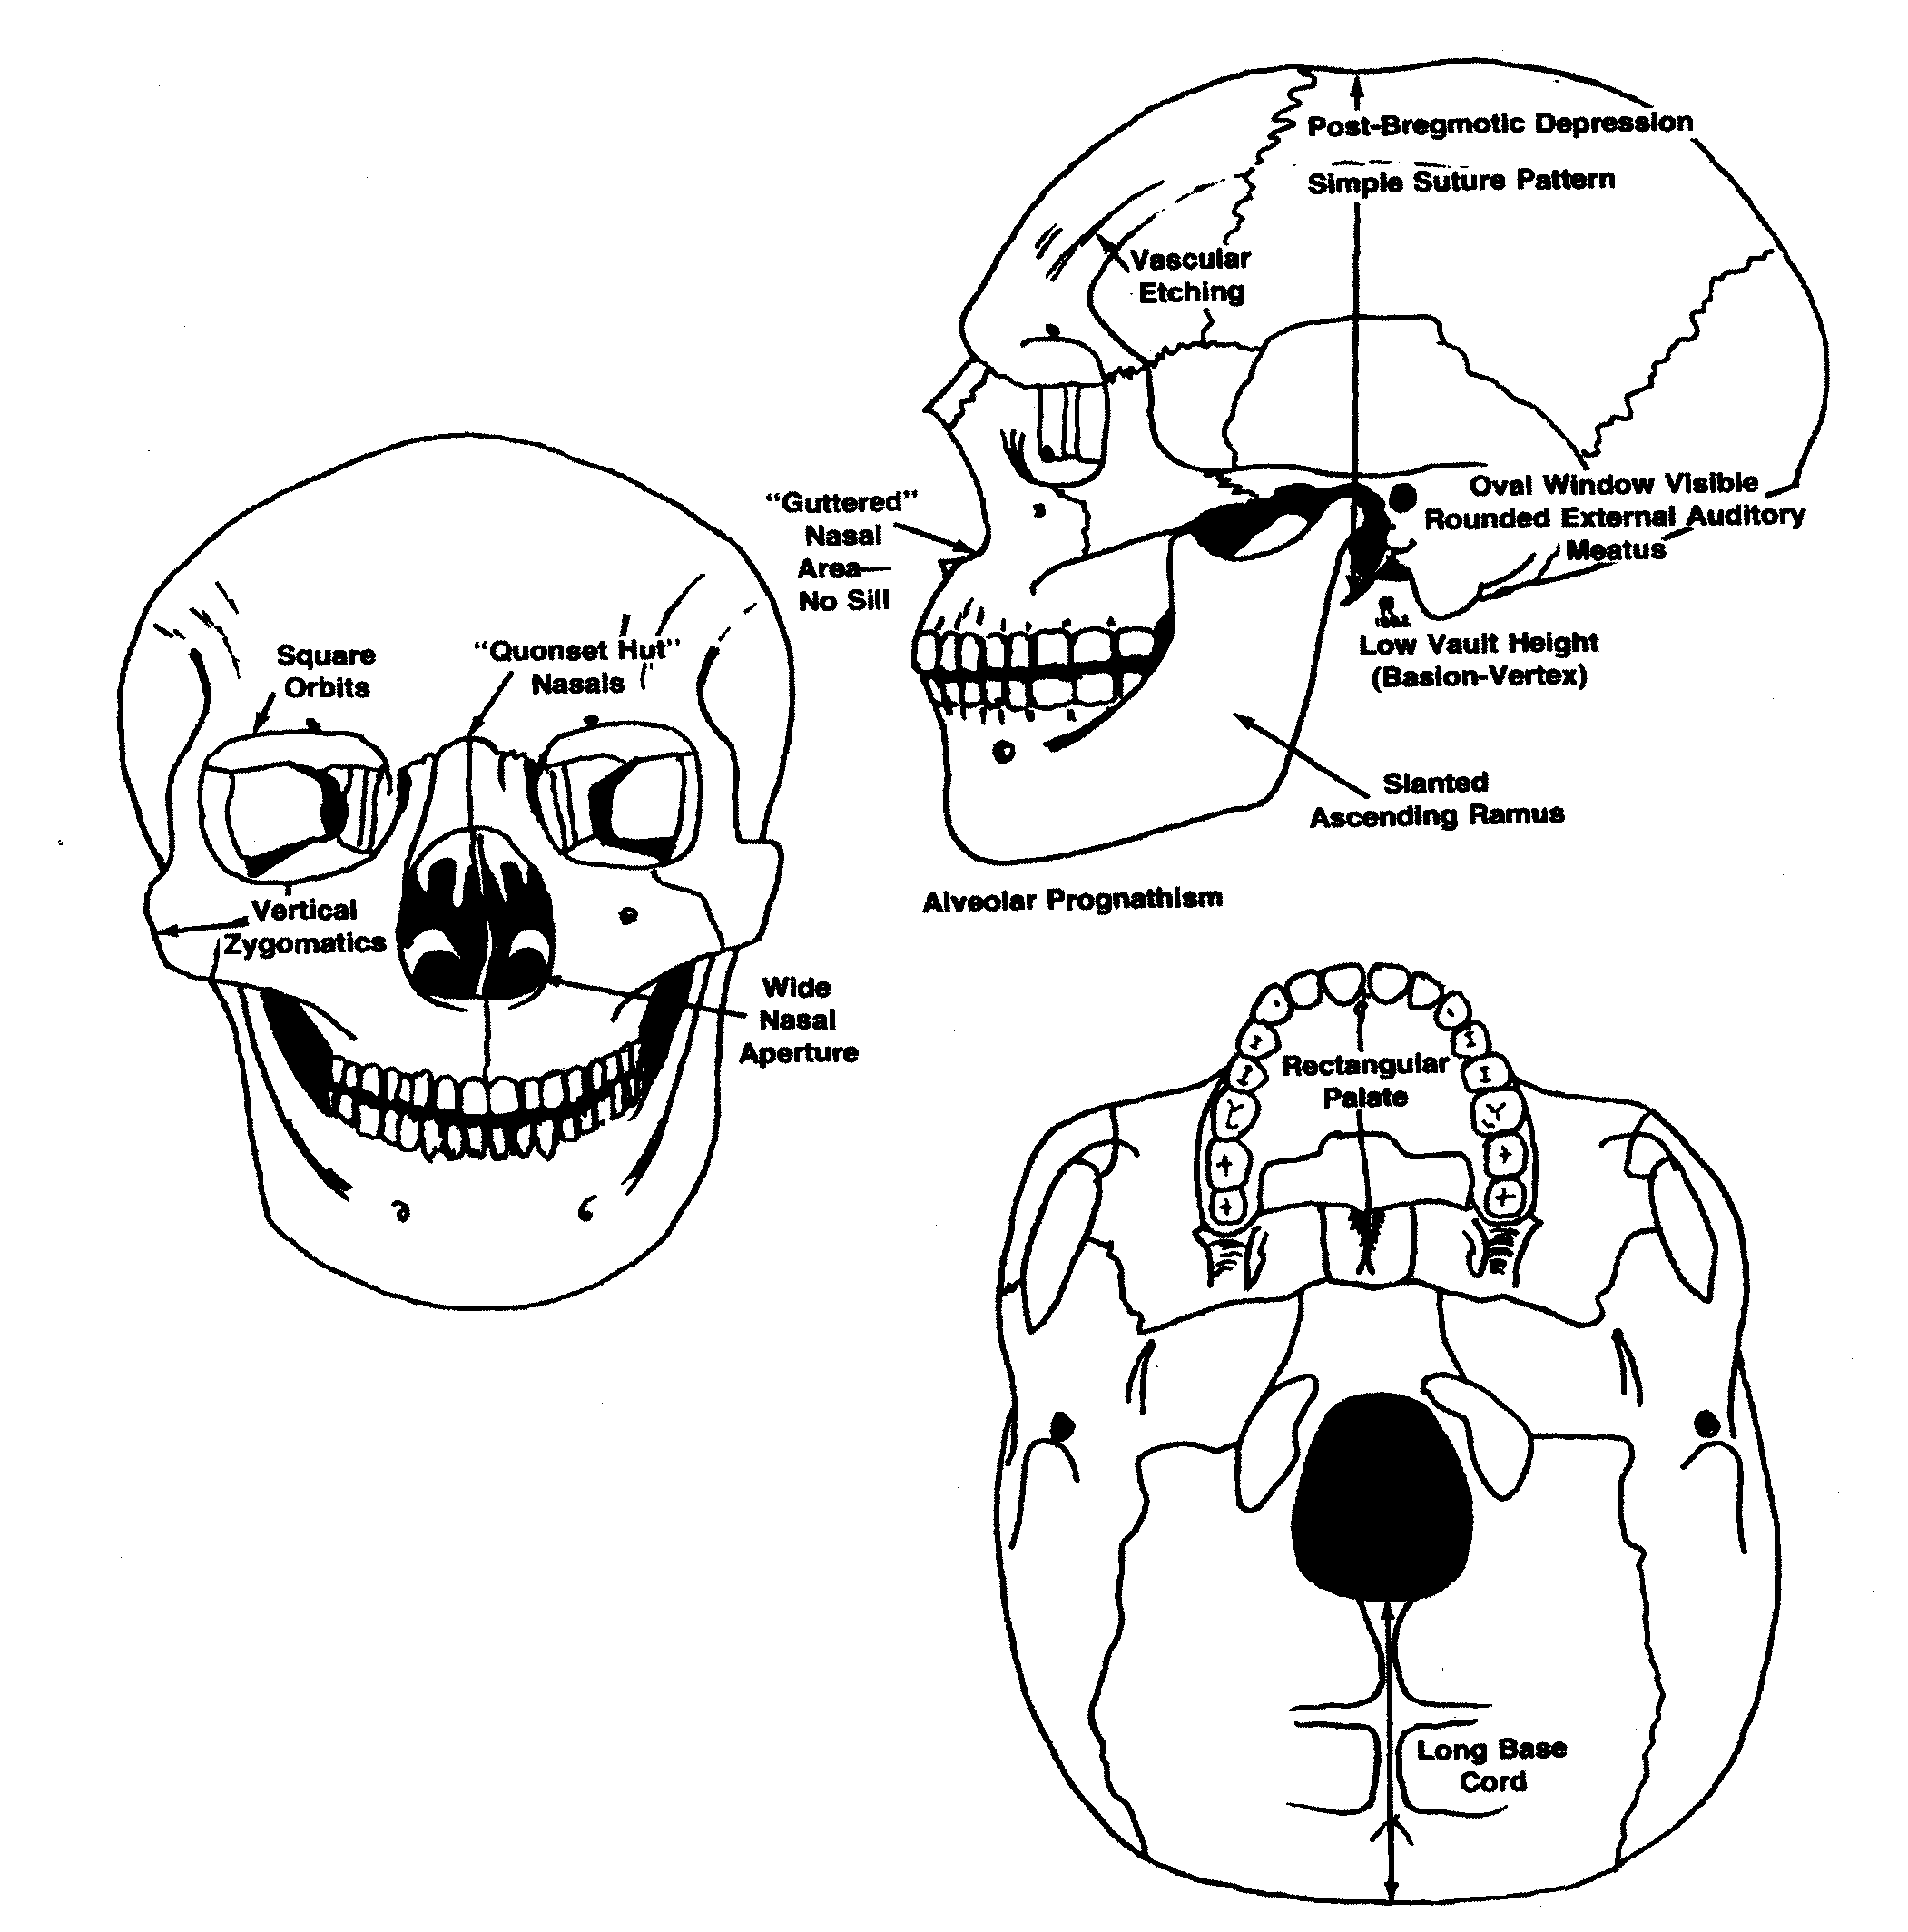
Negroid skull drawings (left
from Bass 1986:85, right from France 2003:238).
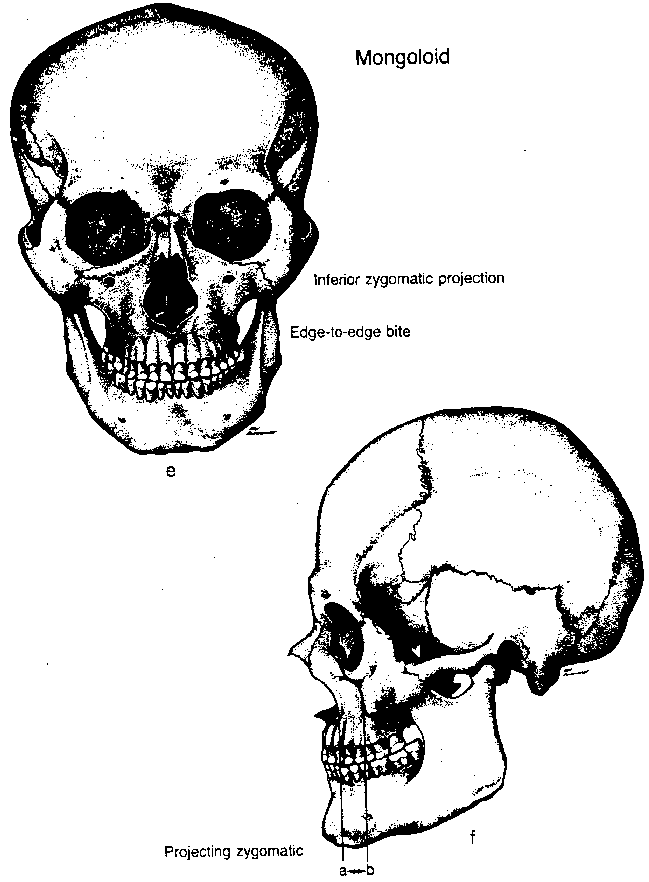
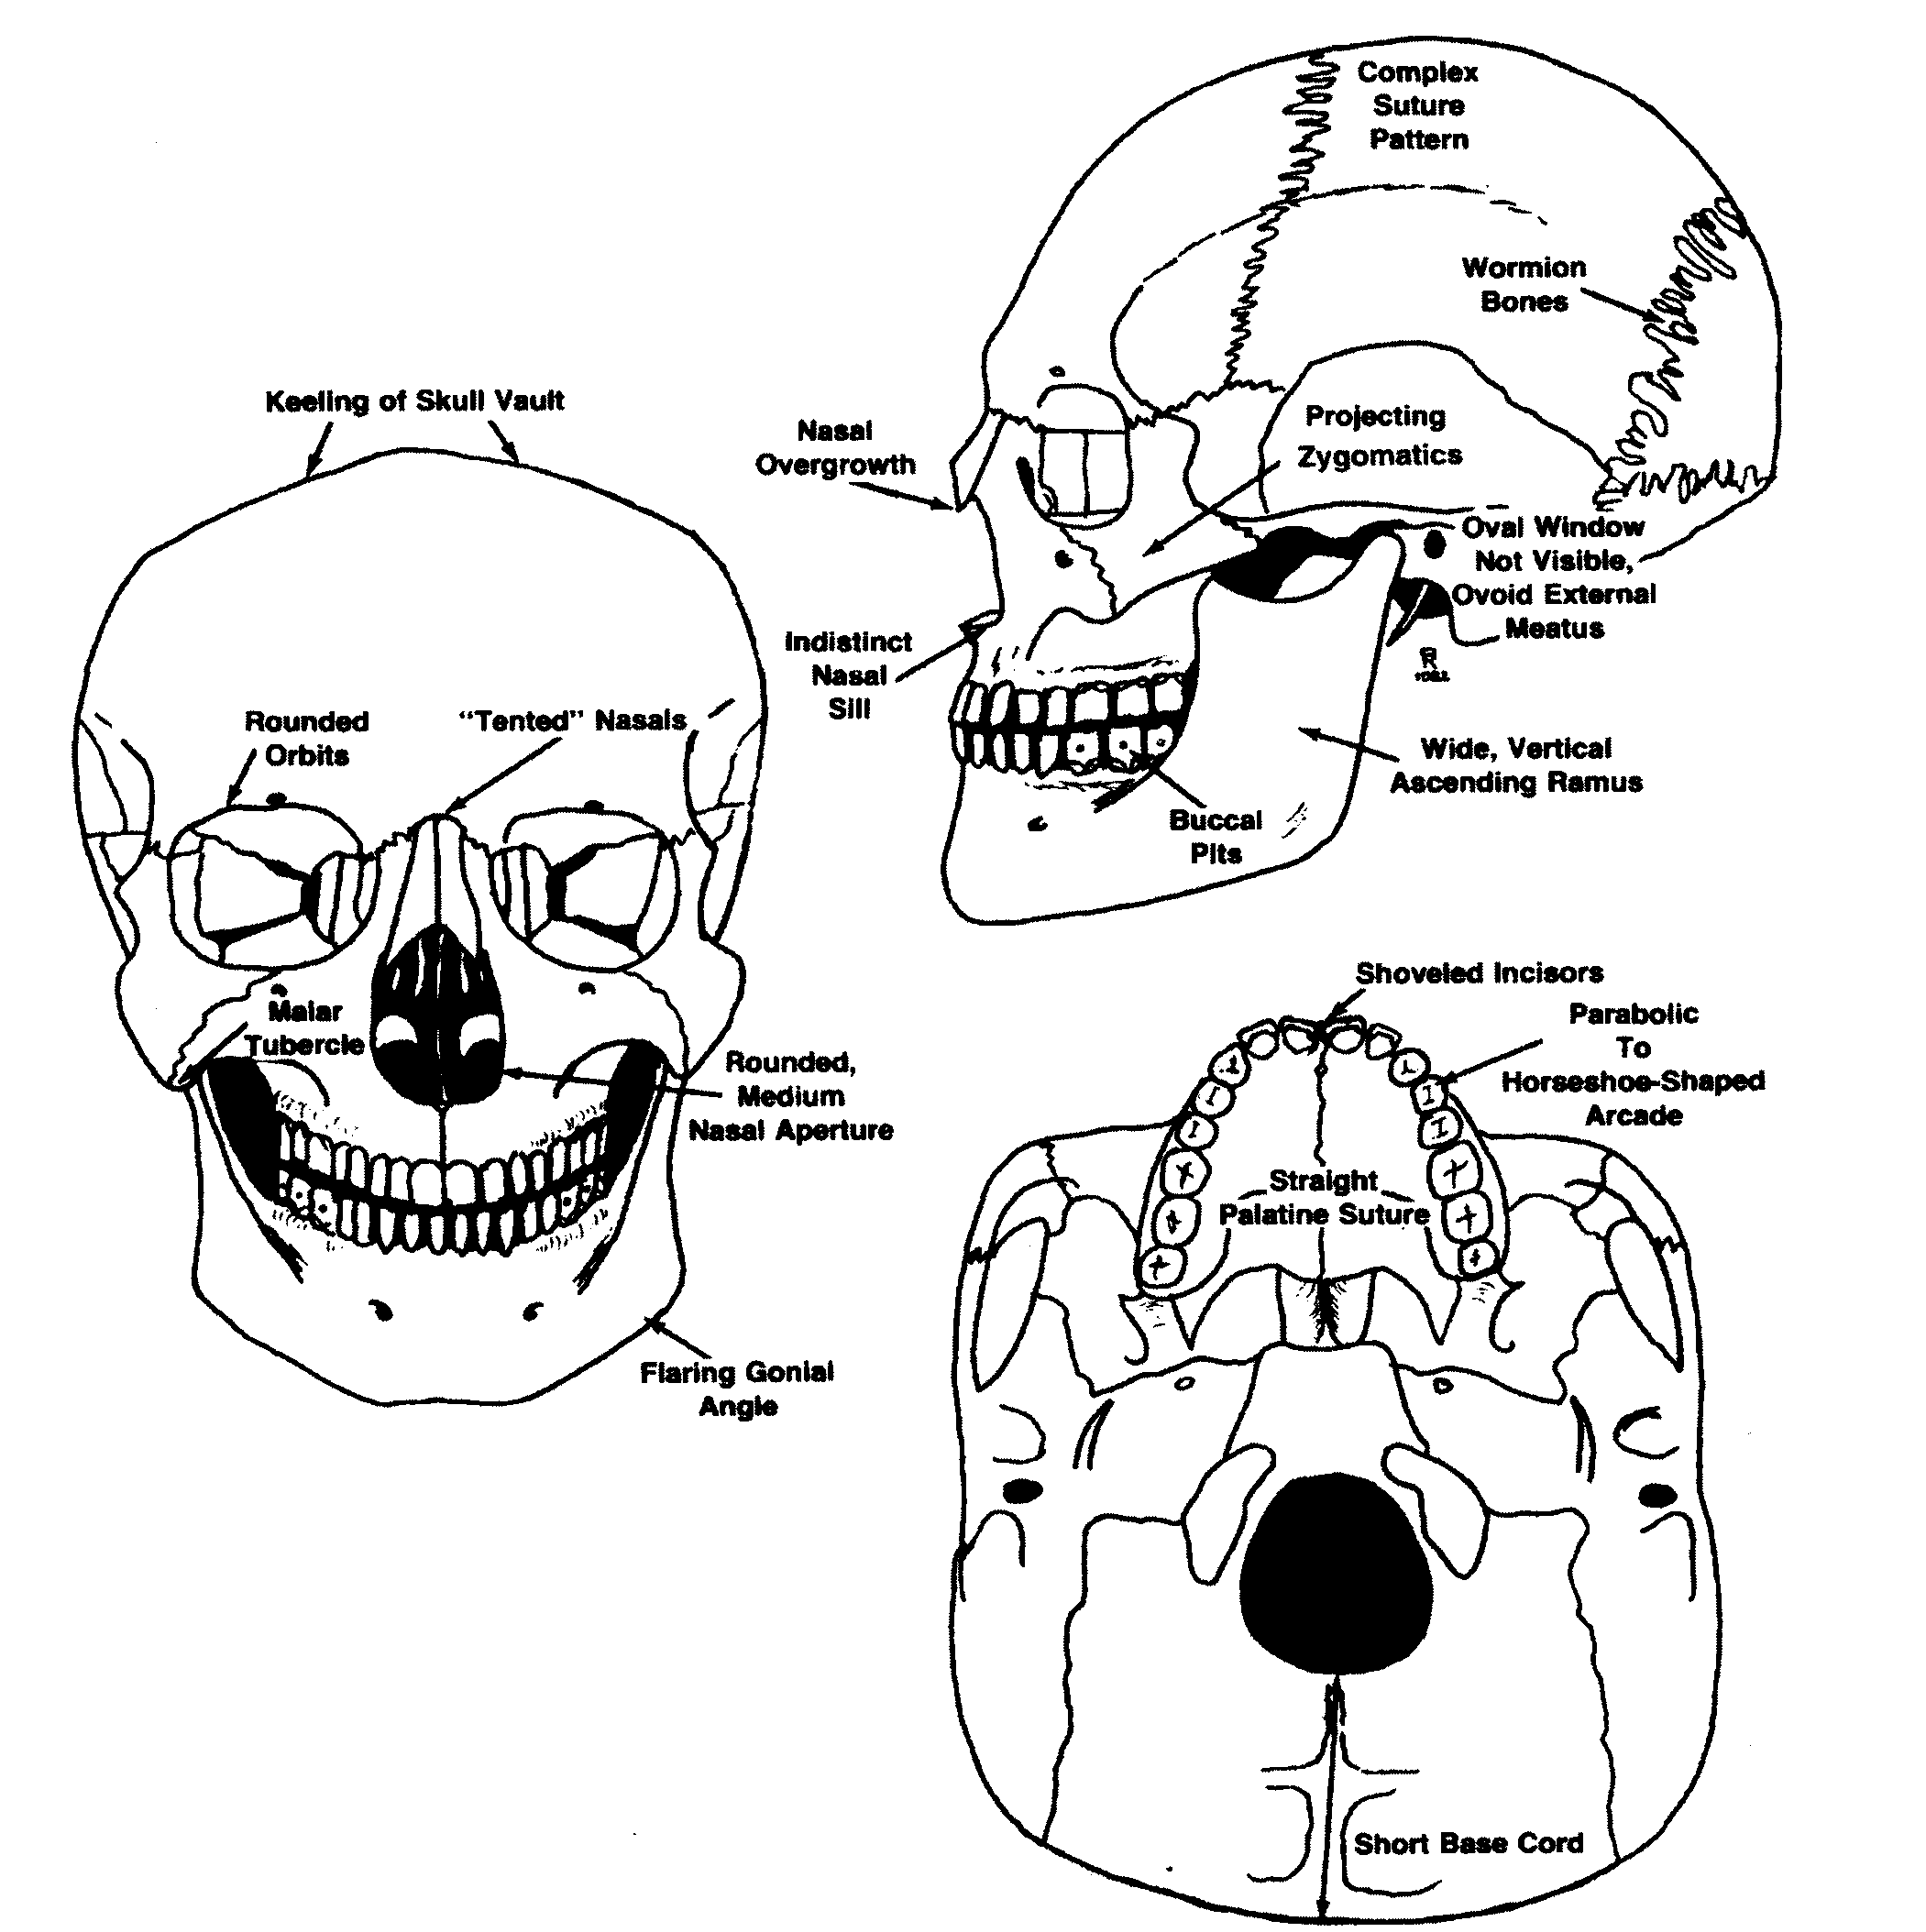
Mongoloid skull drawings (left
from Bass 1986:86, right from France 2003:240).
The following table summarizes typical expressions of 28 metric and
nonmetric skull traits for the three human races. A guide to
assessing
these traits follows the table.
| TRAIT | CAUCASOID | NEGROID | MONGOLOID |
| 1. cranial index | 75 to 80, mesocranic | less than 75, dolicocranic | greater than 80, brachycranic |
| 2. sagittal contour | arched | flat with bregmatic or post-bregmatic depression | arched |
| 3. keeling of skull vault | absent | absent | present |
| 4. total facial index | greater than 90, narrow to very narrow | less than 85, broad to very broad | 85 to 90, medium or average |
| 5. facial profile | orthognathic (straight, flat) | prognathic (projecting), especially in the alveolar area | intermediate to mostly orthognathic |
| 6. nuchal ridge profile | pinched and prominent | slightly pinched | rounded |
| 7. base chord | long |
long | short |
| 8. suture pattern | simple | simple | complex |
| 9. metopic suture | present | absent | absent |
| 10. wormian bones | absent | absent | present |
| 11. eye orbit shape | angular and sloping | square or rectangle | rounded and non-sloping |
| 12. lower eye border | receding | receding | projecting |
| 13. nasal index | less than 48, leptorrhinic (narrow) | greater than 53, platyrrhinic (wide) | 48 to 53, mesorrhinic (intermediate) |
| 14. nasal cavity shape | tear shaped | rounded and wide | oval shaped |
| 15. nasal bones | "tower shaped," narrow and parallel from anterior, slightly arched in profile | "Quonset hut shaped," wide and expanding from anterior, no arch in profile | "tented," narrow and expanding from anterior, arched in profile |
| 16. nasal overgrowth | absent | absent | present |
| 17. nasal sill or dam | present | absent | absent |
| 18. lower nasal spine | large and sharp | small | small |
| 19. zygomatic arches | narrow and retreating | medium to large and retreating | projecting |
| 20. external auditory meati | round | round | oval |
| 21. palate shape | triangular | rectangular | parabolic or horseshoe shaped |
| 22. palate suture | irregular | irregular | straight |
| 23. occlusion | slight overbite | slight overbite | edge-to-edge or even |
| 24. central incisors | blade shaped | blade shaped | shovel shaped |
| 25. shape of ascending ramus of mandible | pinched at midsection | back slanted | wide and vertical |
| 26. projection of ascending
ramus of mandible |
non-projecting |
projecting |
non-projecting |
| 27. gonial angle | slightly flared | not flared | slightly flared |
| 28. chin profile | prominent and projecting | rounded | slightly projecting |
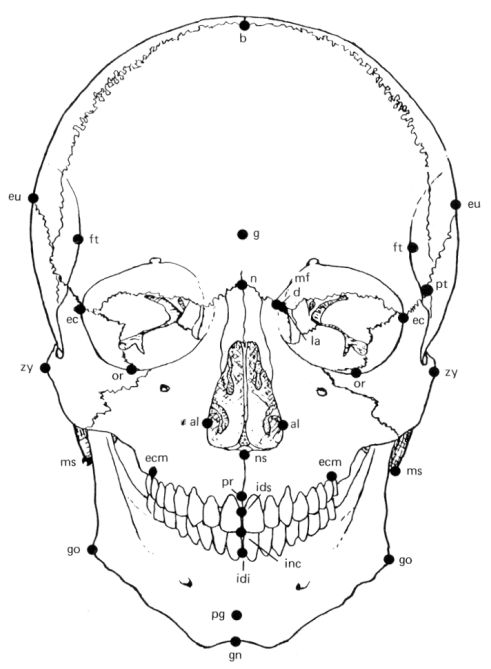
1. CRANIAL INDEX: Use the spreading caliper. Measure the maximum breadth of the skull from euryon (eu) to euyron (eu). Measure the length of the skull from glabella (g) to opisthocranion (op). Divide the cranial breadth by the cranial length and multiply by 100. (See figures below for landmarks.)
2. SAGITTAL CONTOUR: Holding the skull in profile, examine the contour of the cranium along the sagittal suture.
3. KEELING OF SKULL VAULT: Holding the skull in anterior position, examine the contour of the cranium. Keeling is a pinched appearance along the sagittal suture.
4. TOTAL FACIAL INDEX: Use the sliding caliper to measure the maximum heighth of the face from nasion (n) to gnathion (gn). Use the spreading caliper to measure the maximum width of the face from zygion to zygion (zy). Divide the facial height by the facial width and multiply by 100. (See figures below for landmarks.)
5. FACIAL PROFILE: Holding the skull in profile, gently "place one end of your pencil on or near the anterior nasal spine (on the midline of the skull) at the base of the nasal aperture [nasal cavity]. Lower the pencil toward the face so that the pencil will touch the chin" (Bass 1987:87). If the pencil hits the alveolar area of the mouth, the face is prognathic. If the pencil extends to the chin, the face is orthognathic. "Caucasoids have a 'flat' (orthognathous) face in the dental area along the midline. This is the opposite of the Negroid face, which exhibits protrusion of the mouth region, known as prognathism. ... Negroids are noted for alveolar prognathism, or an anterior protrusion, of the mouth region. A pencil or ballpoint pen placed with one end on the nasal spine (midline at base of nasal aperture) will not touch the chin (the teeth protrude too far forward)" (Bass 1986:87).
6. NUCHAL RIDGE PROFILE: Holding the skull in profile, examine the nuchal ridge and note the shape.
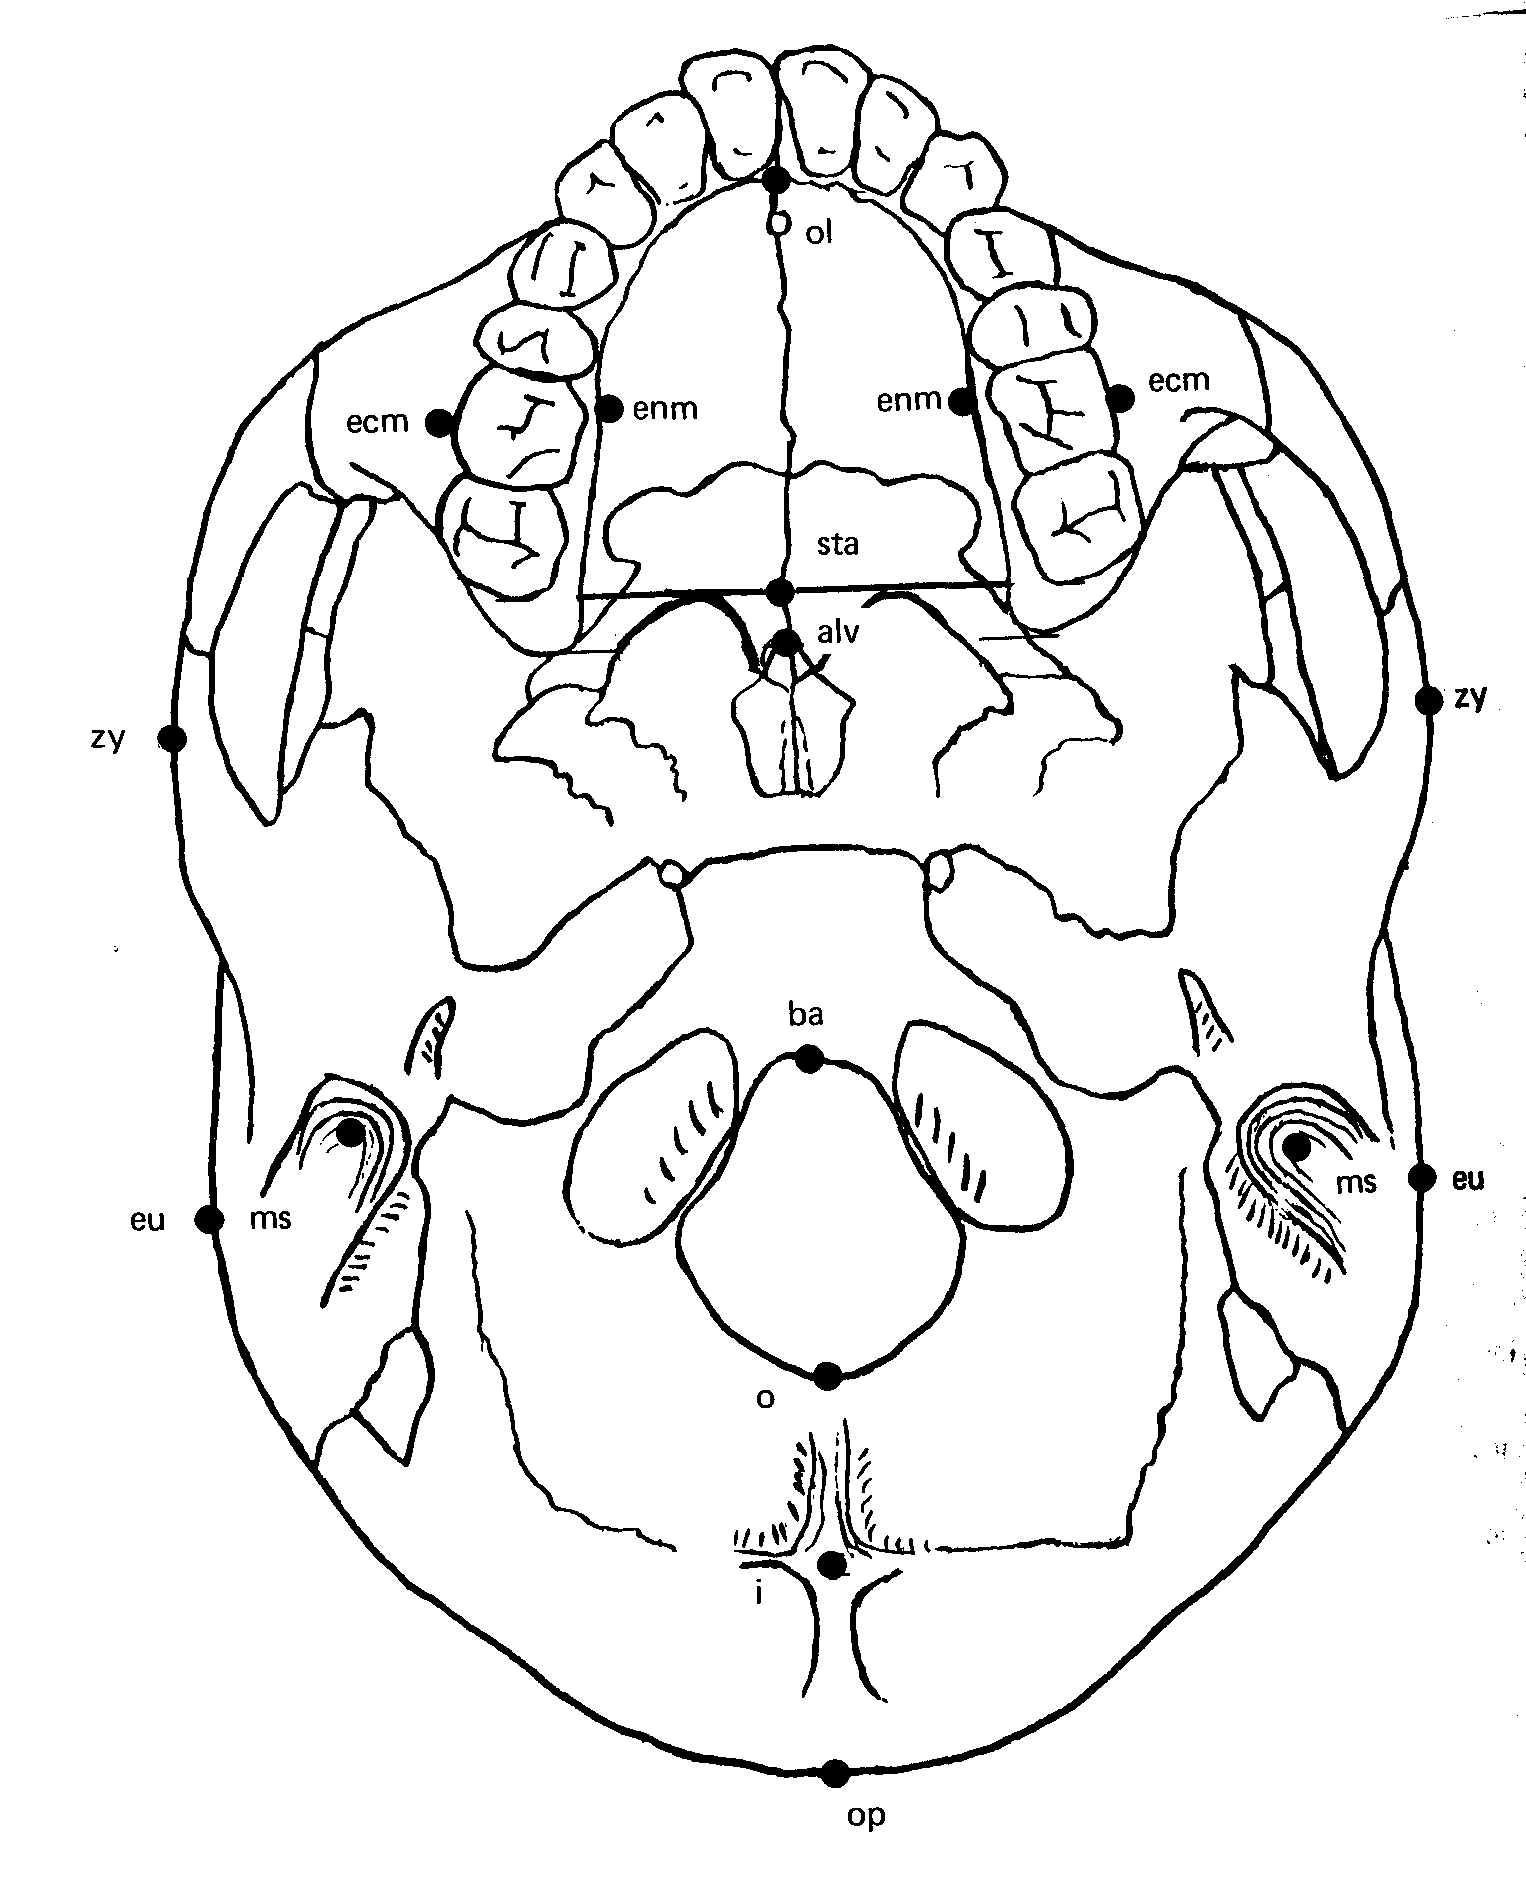
7. BASE CHORD: Holding the skull in inferior view,
examine
the distance between opisthion and opisthocranion. Measure the distance
using the linear caliper.
8. SUTURE PATTERN: Examine the pattern of the cranial sutures (sagittal, cornonal, squamosal, lambdoidal) and describe the pattern as simple (not very convoluted) or complex (very convoluted).
9. METOPIC SUTURE: Examine the frontal bone superior to the nasal bones for evidence of a short suture known as the metopic suture.
10. WORMIAN BONES: Examine the lambdoidal suture and look for small bones within the suture line. These bones are called wormian bones.
11. EYE ORBIT SHAPE: Examine BOTH of the eye orbits from the anterior view. Describe the overall shape as rounded or squared. If the eye orbits are rounded, examine the top border to see if it is level or if it slopes laterally.
12. LOWER EYE BORDER. Examine the skull in profile, gently placing a pencil vertically across the eye orbit. If the pencil is a vertical plane, then the lower eye border is projecting. If the pencil is not a vertical plane, then the lower eye border is not projecting.
13. NASAL INDEX: Using the sliding caliper, measure the maximum breadth of the nasal cavity (at right angles to the nasal height), from alare to alare (al). Measure the nasal height from nasion (n) to nasospinale (ns). Divide the nasal breadth by the nasal height and multiply by 100. (See figures below for landmarks and measurement information.)
14. NASAL CAVITY SHAPE: Examine the overall shape of the nasal cavity from the anterior view.
15. NASAL BONES: Examine the shape of the nasal bones from the anterior and lateral views. From the anterior view, check the width of the bones and whether or not they expand outward from superior to inferior. For the lateral view, check if the bones arch downward (concave up).
16. NASAL OVERGROWTH: Examine the nasal bones from BOTH lateral views. An overgrowth is present if the inferior ends of the nasal bones overhang the superior edge of the nasal cavity.
17. NASAL SILL OR NASAL DAM: "Carefully observe the base
of the nasal aperture [nasal cavity or opening]. With your pencil or
ballpoint
pen resting against the bone of the maxilla just below the nasal
opening,
try to run the pencil or pen gently into the nasal opening. In
Caucasoids
there is usually a dam (nasal sill) that will stop the pen or
pencil.
In Negroid skulls there is no dam or nasal sill, and the pen easily
will
glide into the nasal aperture. Mongoloid skulls will range
between
these two extremes" (Bass 1986:83). Be extremely careful when
inserting
a pen or pencil into the nasal cavity to avoid bone damage. Be sure to
check BOTH sides of the nasal cavity.
18. LOWER NASAL SPINE: Holding the skull in lateral view, examine the lower nasal spine that extends from the inferior edge of the nasal cavity. Describe the shape.
19. ZYGOMATIC ARCHES: "Hold the skull with the occipital
region in your hand and the facial area up. Place a pencil across
the nasal aperture [nasal cavity]. Now try to insert your index
finger
between the cheek (zygomatic) bones and the pencil. Caucasoids
have
a face that comes to a point along the midline and cheek bones that do
not extend forward. This will allow you to insert your finger
between
the cheek bones and the pencil without knocking the pencil off.
Mongoloids
have a much flatter face (the cheek bones extending much further
forward),
and it is difficult to insert your finger between the pencil and the
cheek
bones on a Mongoloid skull without knocking the pencil off" (Bass
1986:83). Be sure to check BOTH zygomatic arches.
20. EXTERNAL AUDITORY MEATI: Holding the skull in
lateral
views, examine the overall shapes of the external auditory meati. Be
sure to check BOTH external auditory meati.
21. PALATE SHAPE: Holding the skull in inferior view, examine the palate area, which includes the maxillae and palatines. Describe the overall shape.
22. PALATE SUTURE: Holding the skull in inferior view, examine the middle portion of the suture between the maxillae and palatines. Describe the shape.
23. OCCLUSION: Holding the skull in lateral view, examine the occlusion of the upper and lower incisors. If the maxillary incisors are anterior relative to the mandibular incisors, this is an overbite. If the maxillary and mandibular incisors meet evenly, this is edge-to-edge occlusion.
24. CENTRAL INCISORS: Holding the mandible in superior view and/or the maxillae in inferior view, examine the shape of the central incisors. Shovel-shaped incisors have posterior-oriented projections.
25. SHAPE OF ASCENDING RAMUS OF MANDIBLE: Holding the
mandible in
lateral view, examine the overall shape of the ascending ramus. Be sure
to check BOTH lateral views.
26. PROJECTION OF ASCENDING RAMUS OF MANDIBLE: Holding
the mandible in posterior view, examine the posterior edge of the
ascending ramus. If the bone projects toward the midline, the ascending
ramus is projecting. If the bone does not project toward the midline,
the ascending ramus is non-projecting.
27. GONIAL ANGLE: Holding the mandible in anterior view, examine BOTH of the gonial angles to see if they are rounded or outward flaring.
28. CHIN: Holding the mandible in lateral view, examine
the relative projection of the chin.
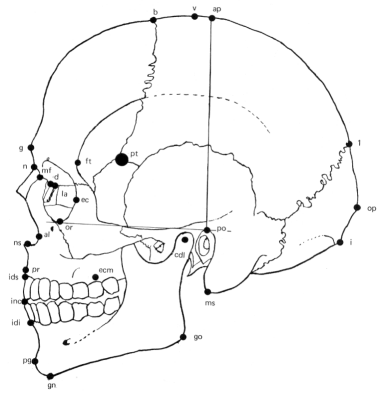
The metric measurements are based on skull landmarks that are
illustrated
in the following drawings of the anterior, inferior, and lateral views
of the skull (Bass 1987:63-65). The skull
landmarks
you need to know and use for this lab are: glabella (g),
opisthocranion
(op), opisthion (o), euryon (eu), nasion (n), nasospinale (ns), alare
(al), gnathion
(gn),
and zygion (zy).
Assignment
Examine the four skulls labeled SKULL1, SKULL2, SKULL3, and
SKULL4. Compare
them to the known skulls and figures in the reference materials.
On the answer sheet, circle all the skull characteristics that you
observe, noting that a trait may be present on one side of the skull
but not the other (in other words, check both sides!).
For the indices,
you will also record the quantitative value (rounded to tenths place)
in the first column of the answer sheets.
If a bone is missing or
broken such that the trait cannot be evaluated on either side of the
skull, mark the last column of the answer sheet for that particular
trait.
Using the three-race model, determine the most likely racial
affiliation
for each specimen.
If appropriate, use qualifying terms such as "probably" or "possibly"
if a specimen has a significant number of traits of more than one race,
but select the race with the largest number of traits.
REFERENCES
Bass, W. M. (1987) Human Osteology: A Laboratory and Field Manual (3rd ed.). Missouri Archaeological Society, Columbia.
France, D. L. (2003) Lab Manual and Workbook for Physical Anthropology (5th ed.). West / Wadsworth, Belmont, CA.
White, T. D. (1991) Human Osteology. Academic Press, San Diego.